Momo
モモ Momo (Momo)
|

|
| Portrait
|
 
|
| Sprite
|
 
|
| Type
|
| Playable Character
|
(BoFIII)
|
|
| Master; Non-Playable Character
|
(BoFIV)
|
|
|
| Home
|
|
| Occupation
|
|
| Height
|
|
| Weight
|
| 59.2 kg (130.5 lbs)
|
(BoFIII)
|
|
|
| Personal Action
|
|
| Weapon
|
|
| Voice actor
|
|
| HP
|
8
|
AP
|
0
|
| Pwr
|
0
|
Def
|
0
|
| Wis
|
0
|
Agl
|
0
|
| Skill
|
Criteria
|
| Spray
|
Play time must be 25 hours
|
| Clip
|
Play time must be 30 hours
|
| Oracle
|
Play time must be 40 hours
|
| Egghead
|
Play time must be 50 hours
|
| Will
|
Drowse - characters in the back row of a fight will fall asleep and recover 10% of their HP/AP
|
| I
|
II
|
III
|
IV
|
V
|
VI
|
- "Momo is an independent scientist who knows just about everything about machines and chrysm. She has a chrysm-powered assistant named Honey to help her. Her extensive knowledge proves useful time and time again while traveling with Ryu and his friends. Momo wields a huge bazooka as her weapon and it packs a wallop, but it isn't very accurate. She learns a few powerful attack spells, as well as some healing and assist magic, making her a vital member of your final line-up."
- — Bio
Momo is a character within Breath of Fire III and Breath of Fire IV. She is a red-haired, long-eared young woman, who is a part of the Grassrunner clan. She is the daughter of Repsol.
Story
Breath of Fire III
Momo is a reclusive scientist who holed herself up in a great Tower after her father's, Repsol's, death in order to try to finish his incomplete research on the magical ore known as chrysm. She possesses a great deal of a natural genius probably inherited from her father. This intelligence comes with an unintentional arrogance that she exhibits by making claims that her father's research (and therefore some of her own) is great and probably infallible. Despite this, she is a kindhearted individual whose curiosity and intelligence drive her to finding new ways for science to benefit the world. Later on in the game she has a tendency to argue with Rei after the incident when she tried to stop the Black Ship with her bazooka and instead had the ship attack them. They would argue, or at least throw an insult, on and off, but despite that it doesn't disrupt their teamwork.
Momo is first introduced to Ryu and Nina when they take refuge in the tower from Balio and Sunder's henchmen. They tell Momo about their dilemma and she takes it upon herself to help them escape, as she's the only one who knows the tower inside out. After they escape, they head to the Coffee Shop, where Momo reunites with Palet, who invites them to The Plant. Accepting his invite, they head there to fix their little "mutant" problem. Afterwards, Peco joins the party. Enroute to Wyndia, Palet betrays the group to Balio and Sunder. They are shipped to Genmel, where they enter in the Contest of Champions to win their freedom. During the contest, either Momo or Peco, unfortunately, are held captive in a cage. Once the contest ends, Momo/Peco is freed, they finally kill Balio and Sunder, and they head to Angel Tower.
In the game's second half, Momo follows Ryu and his friends to discover the origin of the machines that wash up on the shores of the Eastern World. Momo plays a much larger role and is required at practically every location, as she is the only character that is tech savvy.
Breath of Fire IV
Momo makes a cameo appearance in Breath of Fire IV as a master. She seems to be very confused and feels that she doesn't belong there. Feeling this way, she thinks that she is originally from another dimension. Momo is located in Wyndia inside of, what appears to be, a windmill. It is unclear whether her appearance is just an Easter Egg or she somehow she got stuck in the future or the past.
Battle
Momo is an interesting character in battle as she wields a chrysm-powered bazooka. Her attack power is quite high, but the chaotic nature of her weapon makes her accuracy immediately shoddy. Even with the accuracy increasing Artemis Cap, she struggles to hit her enemies. It's also a good idea to equip her with the Bat Amulet so that attacks such as Blind don't cripple her already shaky accuracy, otherwise it can potentially devastate her offensive power. Her magical capabilities are far more balanced, however, as her intelligence and AP make her a capable magician in her own right. She possesses some moderately powerful healing spells, and a scant number of earth-elemental offensive spells (being the only main character in the game who can naturally learn earth spells), but her true forte is support magic. She is the only character able to use the very useful spell Might, an attack enhancer, and has the AP to spare for copious uses of Protect and Speed. Her defense is quite low, but she has above average speed. She is very often a part of a player's final line up due to her potent combination of status enhancing spells, offensive magic, attack power and speed.
Alternatively, with the right set-up, you can also employ her high attack power to good use. The safest way is to apprentice Momo to D'Lonzo giving her higher accuracy (though she'll still need the Artemis Cap) and a modest boost in attack and agility, easily making her a viable attacker for regular battles. This can work in conjunction with the Skill Double Blow, which will allow her to take down many kinds of monsters with just two shots for the low cost of 2 AP. Spirit Blast is another option to consider, as it ignores Defense, which will allow her high Attack to deal heavy damage strong foes. Another way is to partner her with Bunyan early on as a master and capitalize on pure attack, though you can easily mix and match to suit your preference. What makes this tick is that Bunyan's skills (such as Focus and Super Combo) allows Momo to deal a tremendous amount of damage which never misses. Couple that with a naturally high attack and early access to elemental weapons and you have another character that can match Ryu for boss fights. Another viable combo is to use Shadowwalk, which, when mixed with an early advantage Bunyan, means you have a very high damage, never-missing critical hit, as well as a strong support when needed. As far as defense goes, apprenticing her under Fahl helps to boost her HP and defense stats, which increases her low-moderate tanking ability.
Abilities
Abilities
|
| Level
|
Ability
|
Type
|
Description
|
AP Cost
|
| -
|
Heal
|
Heal
|
Heal light wounds on 1 target
|
4
|
| -
|
Purify
|
Heal
|
Cures Poison on 1 target
|
4
|
| -
|
Identify
|
Assist
|
Displays enemies data
|
0
|
| -
|
Foretell
|
Assist
|
Divine outcome of battle
|
0
|
| -
|
Protect
|
Assist
|
Raises 1 target's defense
|
2
|
| -
|
Silence
|
Assist
|
Stops magic use by all targets
|
2
|
| 12
|
Sleep
|
Assist
|
Induce sleep in all target
|
3
|
| 13
|
Quake
|
Attack
|
Earthquake against all enemies
|
7
|
| 14
|
Confuse
|
Assist
|
Induce confuse on 1 target
|
2
|
| 17
|
Speed
|
Assist
|
Raises one target's agility
|
2
|
| 19
|
Rejuvenate
|
Heal
|
Heals Medium target on 1 target
|
7
|
| 20
|
Might
|
Assist
|
Raises one targets power
|
4
|
| 24
|
Remedy
|
Heal
|
Cures all status changes
|
7
|
| 27
|
Raise Dead
|
Heal
|
Chance of restoring dead
|
10
|
| 29
|
Ragnarok
|
Attack
|
Comet attack against all enemies
|
12
|
| 33
|
Vitalize
|
Heal
|
Heals medium wounds on all targets
|
20
|
| 36
|
Restore
|
Heal
|
Heals heavy wounds on 1 target
|
12
|
Stats
Stats
|
| Lvl
|
HP
|
AP
|
Pwr
|
Def
|
Agl
|
Int
|
| 1
|
|
|
|
|
|
|
| 2
|
|
|
|
|
|
|
| 3
|
|
|
|
|
|
|
| 4
|
|
|
|
|
|
|
| 5
|
|
|
|
|
|
|
| 6
|
|
|
|
|
|
|
| 7
|
|
|
|
|
|
|
| 8
|
|
|
|
|
|
|
| 9
|
|
|
|
|
|
|
| 10
|
52
|
40
|
30
|
25
|
15
|
50
|
| 11
|
55
|
42
|
30
|
25
|
17
|
52
|
| 12
|
60
|
48
|
33
|
27
|
17
|
57
|
| 13
|
65
|
48
|
37
|
29
|
17
|
60
|
| 14
|
69
|
53
|
39
|
30
|
18
|
63
|
| 15
|
73
|
56
|
43
|
33
|
20
|
63
|
| 16
|
78
|
60
|
45
|
36
|
20
|
69
|
| 17
|
80
|
62
|
48
|
36
|
21
|
73
|
| 18
|
86
|
67
|
49
|
38
|
21
|
79
|
| 19
|
90
|
73
|
53
|
39
|
22
|
84
|
| 20
|
95
|
75
|
56
|
43
|
23
|
88
|
| 21
|
98
|
82
|
58
|
45
|
23
|
95
|
| 22
|
104
|
85
|
62
|
45
|
25
|
97
|
| 23
|
110
|
91
|
66
|
47
|
26
|
102
|
| 24
|
114
|
94
|
71
|
51
|
27
|
106
|
| 25
|
117
|
98
|
72
|
54
|
27
|
113
|
| 26
|
112
|
100
|
75
|
55
|
29
|
118
|
| 27
|
128
|
101
|
77
|
56
|
29
|
121
|
| 28
|
133
|
106
|
81
|
58
|
30
|
124
|
| 29
|
139
|
109
|
83
|
61
|
31
|
131
|
| 30
|
143
|
113
|
86
|
63
|
32
|
136
|
| 31
|
145
|
118
|
90
|
63
|
32
|
144
|
| 32
|
151
|
120
|
92
|
66
|
32
|
149
|
| 33
|
156
|
120
|
95
|
68
|
35
|
152
|
| 34
|
160
|
124
|
95
|
71
|
36
|
156
|
| 35
|
165
|
128
|
100
|
72
|
36
|
163
|
| 36
|
174
|
131
|
101
|
76
|
38
|
166
|
| 37
|
179
|
133
|
105
|
78
|
40
|
171
|
| 38
|
185
|
138
|
109
|
80
|
40
|
177
|
| 39
|
190
|
139
|
112
|
81
|
42
|
181
|
| 40
|
194
|
143
|
116
|
83
|
42
|
185
|
| 41
|
197
|
147
|
118
|
84
|
42
|
190
|
| 42
|
201
|
149
|
122
|
87
|
42
|
192
|
| 43
|
203
|
153
|
125
|
87
|
45
|
195
|
| 44
|
209
|
156
|
127
|
90
|
45
|
199
|
| 45
|
214
|
158
|
131
|
90
|
47
|
203
|
| 46
|
217
|
161
|
131
|
92
|
48
|
203
|
| 47
|
217
|
165
|
134
|
93
|
48
|
206
|
| 48
|
221
|
167
|
136
|
95
|
49
|
207
|
| 49
|
224
|
168
|
138
|
95
|
50
|
211
|
| 50
|
226
|
170
|
138
|
96
|
50
|
215
|
| 51
|
226
|
173
|
140
|
97
|
50
|
217
|
| 52
|
229
|
174
|
140
|
97
|
51
|
220
|
| 53
|
232
|
174
|
141
|
99
|
51
|
220
|
| 54
|
233
|
176
|
142
|
99
|
53
|
222
|
| 55
|
233
|
176
|
145
|
99
|
53
|
222
|
| 56
|
234
|
180
|
145
|
101
|
53
|
223
|
| 57
|
234
|
180
|
146
|
102
|
55
|
227
|
| 58
|
236
|
183
|
146
|
103
|
55
|
227
|
| 59
|
238
|
183
|
147
|
103
|
55
|
230
|
| 60
|
241
|
185
|
149
|
103
|
56
|
230
|
| 61
|
241
|
186
|
149
|
104
|
56
|
234
|
| 62
|
243
|
186
|
149
|
104
|
56
|
234
|
| 63
|
244
|
186
|
151
|
104
|
56
|
236
|
| 64
|
246
|
188
|
152
|
105
|
56
|
236
|
| 65
|
247
|
188
|
153
|
105
|
59
|
237
|
| 66
|
247
|
189
|
153
|
106
|
59
|
239
|
| 67
|
249
|
189
|
154
|
106
|
59
|
239
|
| 68
|
249
|
190
|
155
|
108
|
59
|
239
|
| 69
|
249
|
191
|
155
|
108
|
61
|
240
|
| 70
|
252
|
191
|
157
|
108
|
61
|
240
|
| 71
|
253
|
191
|
158
|
108
|
61
|
242
|
| 72
|
253
|
193
|
158
|
109
|
61
|
242
|
| 73
|
255
|
193
|
158
|
110
|
64
|
243
|
| 74
|
255
|
194
|
160
|
111
|
64
|
244
|
| 75
|
255
|
194
|
160
|
111
|
64
|
247
|
| 76
|
256
|
194
|
162
|
111
|
64
|
247
|
| 77
|
257
|
196
|
162
|
112
|
65
|
247
|
| 78
|
258
|
198
|
164
|
112
|
65
|
248
|
| 79
|
258
|
198
|
164
|
114
|
66
|
250
|
| 80
|
260
|
198
|
164
|
114
|
67
|
250
|
| 81
|
260
|
199
|
165
|
116
|
67
|
250
|
| 82
|
262
|
199
|
166
|
116
|
67
|
252
|
| 83
|
264
|
200
|
166
|
117
|
68
|
253
|
| 84
|
264
|
200
|
167
|
118
|
68
|
253
|
| 85
|
264
|
202
|
167
|
118
|
68
|
253
|
| 86
|
265
|
204
|
168
|
118
|
68
|
255
|
| 87
|
265
|
204
|
168
|
119
|
69
|
255
|
| 88
|
266
|
206
|
170
|
119
|
69
|
258
|
| 89
|
266
|
207
|
170
|
120
|
69
|
260
|
| 90
|
267
|
208
|
171
|
121
|
69
|
260
|
| 91
|
267
|
208
|
173
|
121
|
79
|
261
|
| 92
|
269
|
210
|
173
|
121
|
79
|
261
|
| 93
|
270
|
210
|
173
|
122
|
72
|
261
|
| 94
|
270
|
210
|
173
|
123
|
72
|
261
|
| 95
|
270
|
210
|
175
|
123
|
72
|
261
|
| 96
|
271
|
210
|
175
|
123
|
73
|
264
|
| 97
|
272
|
210
|
176
|
124
|
73
|
266
|
| 98
|
272
|
210
|
177
|
124
|
74
|
266
|
| 99
|
272
|
212
|
178
|
124
|
74
|
268
|
Intrinsics
| Surprise
|
Reprisal
|
Critical
|
Dodge
|
Accuracy
|
Willpower
|
| 30
|
0
|
0
|
4
|
70%
|
6
|
Gallery
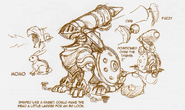
Concept art depicting the evolution of the character's appearance throughout development
Concept art depicting how Momo's rabbit-based design influenced her Hybrid transformation
Trivia
- Momo is the only character whose weapons don't lower her Agility regardless of weight, as she retains the same weapon throughout the game, meaning her weapon upgrades are merely ammunition upgrades.


