InformationEdit
|
Northern AL Waters 北方AL海域 | |
 | |
 | |
| Information | |
| Special Mechanics | LoS Check |
| Experience | HQ: 190 non-boss, 2880 boss |
| Kills required | 4? |
| Rewards | |
 Ranking Points: 150
| |
| In-game description | |
| Operation | 北方海域戦闘哨戒 Northern Water Combat Patrols |
| Task | 北方海域に敵増援の動きがある。中規模の水上打撃部隊を派遣し、敵増援を捕捉、これを撃破せよ! There is a movement of enemy reinforcements to the Northern waters. Dispatch a medium sized surface combat fleet, capture the enemy reinforcements and destroy them! |
| Branching Rules | ||
|---|---|---|
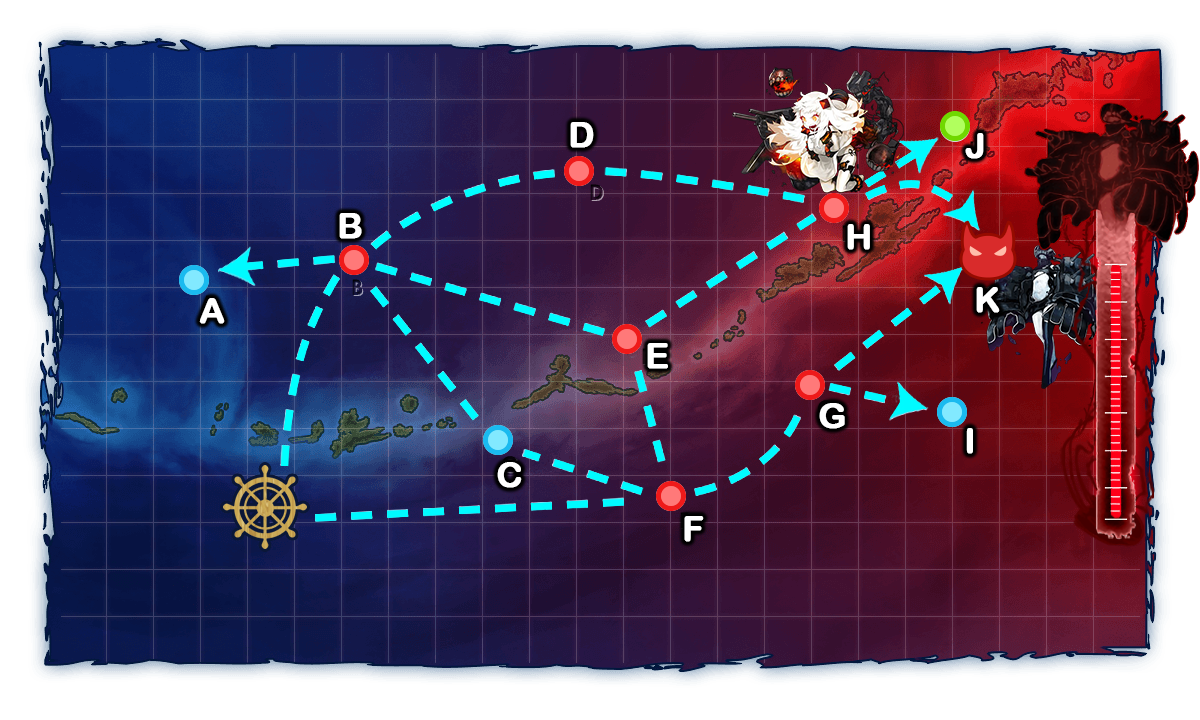
| Nodes | Rules | |
| Start | B |
|
F |
| |
B |
A |
|
C |
| |
D |
| |
E |
| |
E |
H |
|
F |
E |
|
G |
| |
G |
I |
|
K |
||
H |
J |
|
K |
| |
- To clear 3-5, you need to sink the boss flagship 4 times.
- LoS requirement is 28 in F33(Cn=4) for G->K.
- Cn=4 indicates that the LoS you receive from equipment weights 4x more than usual.
- Clearing this map rewards a Medal and 150 ranking points.
Tips
- The central routes (B-E-H-K or F-E-H-K) are not recommended as there is an enemy submarine on E node, which diverts attacks from DD & CL while stronger enemy ships deal heavy damage.
- Some recommended fleet compositions:
North Route (B-D-H-K)
- 3 CV + 2 CLT + 1 SS / 3 CLT + 3 CV / 3CV + 3SS
- Opening torpedo and air attack can clear out the enemy easily, but it's not effective against Hoppou.
- Hoppou is always forced to attack submarines and her
 is weak, but other light enemy ships are a threat to your submarine.
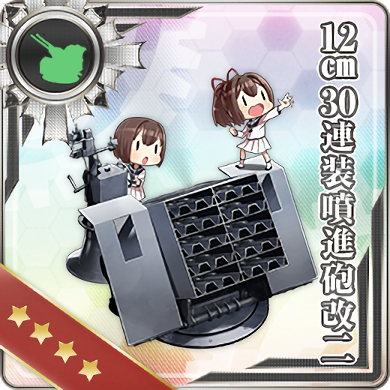
 - With 12cm 30-tube Rocket Launcher Kai Ni
 , all CV and CAV that have this equipped will have a chance of taking no damage during airstrike.
- 3 CV(B) + 3 CA(V)
- CA(V) can bring
 Type 3 Shell to disable/destroy Hoppou. This is completely unnecessary if you wish to only reach the boss.
- CA(V) can bring

South Route (F-G-K)
- 1 CL + 5 DD / 1 AV + 5 DD
- Guaranteed to reach the boss via F-G-K if you can pass the LOS check.
- Bring more surface RADAR if you cannot meet the LoS requirement with a seaplane only.
- You should bring your best DD, players without enough good DD should consider an alternative option.
South Route (F-G-K) OR (B-C-F-G-K) with CL and AV
- 2 AV + 2 CL + 2 DD / 4 AV + 2 CL
- Allowing more CL to utilize and AV for opening attacks while preventing Air Incapability
- You are allowed to freely interchange DDs with AVs if you want, you can even go for 4 AV + 2 CL.
- However, the downside of this setup is that the risk of off-routing to B at the beginning. But in case you survived the B node, you can still continue down the B-C-F-G-K route as routing from F to G is always guaranteed.
South Route (B-C-F-G-K) with Hayasui Kai and 2 AVs

- Hayasui Kai + Abukuma Kai Ni + 1 CLT + 1CL + 2 AV
- This setup takes the longer route but allows for stronger openings compared to the fleets presented above. A total of 3 opening torpedoes, 2 Torpedo Bombers and at least 2-3 Seaplane Bombers can be brought, making this fleet very useful for taking out a high number of ships before the shelling phase. The main issue of this fleet are the inflated costs if Hayasui Kai gets damaged and the first battle at node B. Otherwise, it should not pose serious threats on nodes F and G for the reasons mentioned above. You are recommended to put Hayasui Kai as flagship for her extreme frailty to reduce the chances of being targeted by any enemy ship. She is best used with 2
 and a SCAMP
 to increase her shelling power significantly. Do note however, that her very small slots are subject to rank losses against the Light Cruiser Tsu-Class at the Boss node.
- This setup takes the longer route but allows for stronger openings compared to the fleets presented above. A total of 3 opening torpedoes, 2 Torpedo Bombers and at least 2-3 Seaplane Bombers can be brought, making this fleet very useful for taking out a high number of ships before the shelling phase. The main issue of this fleet are the inflated costs if Hayasui Kai gets damaged and the first battle at node B. Otherwise, it should not pose serious threats on nodes F and G for the reasons mentioned above. You are recommended to put Hayasui Kai as flagship for her extreme frailty to reduce the chances of being targeted by any enemy ship. She is best used with 2


- NOTE: Enemy patterns below with (Final) will always be encountered when the boss gauge is 1/4 or if you've already completed this map.
- Although there is no visual difference, players at HQ 84 and below will face a weaker version of the Northern Princess at node H.
Enemy patterns

Lua error in package.lua at line 80: module 'Module:Data/Map/Translation' not found. Lua error in package.lua at line 80: module 'Module:Data/Map/Translation' not found. Lua error in package.lua at line 80: module 'Module:Data/Map/Translation' not found. Lua error in package.lua at line 80: module 'Module:Data/Map/Translation' not found. Lua error in package.lua at line 80: module 'Module:Data/Map/Translation' not found. Lua error in package.lua at line 80: module 'Module:Data/Map/Translation' not found. Lua error in package.lua at line 80: module 'Module:Data/Map/Translation' not found. Lua error in package.lua at line 80: module 'Module:Data/Map/Translation' not found. Lua error in package.lua at line 80: module 'Module:Data/Map/Translation' not found. Lua error in package.lua at line 80: module 'Module:Data/Map/Translation' not found. Lua error in package.lua at line 80: module 'Module:Data/Map/Translation' not found.