| This article is about Anchor. You may be looking for Transmitter. |

"ALL SYSTEMS FUNCTIONAL
PRESS TO POWER BRIDGE"
- The message on the Transmitter after all Anchors are completed
Anchors are Features in The Nest in The Mines.
 Usage
Usage
Anchors are used to power the machine to lower the bridge in The Nest in order to escape. The player must insert a 3-digit code provided by the transmitter on the keypad and pull the lever to the right of it to activate in order to escape the nest, door 150.
 Appearance
Anchors are a tall thin box with a keypad that has 11 buttons and a lever on the side. A screen displays the numbers inputted and around the screen are 8 knobs and 3 sliders. There is a sign on top that shows the corresponding letter of the anchor and 4 tubes out the back going into the ground. There is also an antenna on top with a green light.
 Walkthrough
Anchor Location
When facing the direction of the screens on the transmitter (or towards Anchor A), you will be facing "forward"
|
Location: Room Behind Transmitter Satellite Dish Direction: Forwards Directions: Turn around and walk to the anchor
Location: Room with vines blocking Anchor. Satellite Dish Direction: Forward and to the right. Directions: Go through the left path of the main hall. When you reach the caves, follow the left one until there is a path on the right. Take the path until you see the tunnel on the left. Follow the tunnel until you reach the Anchor.
Location: Room on ravine ledge to the right of bridge. Satellite Dish Direction: Forward and to the left. Directions: Go through the left path of the main hall. When you reach the caves, follow the left one until there is a cave on the left. Go past the cave and enter the path on the path on the left. Then follow the next path until there is a door on the right. Enter the door and the Anchor should be right there. Note: There is a one-way path to the left of this room back to the transmitter.
Location: Entrance to coffin corner. Satellite Dish Direction: Backward and to the right. Directions: Go through the right path of the main hall. Follow the path. Turn right and follow the path until there is a room on the right. Enter the room and the anchor will be right there. Note: Stand beside the anchor as opposed to facing it to avoid a Grumble getting you in this area.
Location: Room in coffin corner. Satellite Dish Direction: Backward and straight. Directions: Go through the right path of the main hall. Follow the path. Turn right and follow the path until there is a room on the right. Upon entering the room follow the right path of the cave and then follow the cave forward until you reach two separating paths. Follow the right one (Not the right cave, the path beyond it) until there is a room on the right. The Anchor is in there. Note: if it isn't there, then it is the other Anchor in coffin corner. You are already in the right area, just refer to the location below.
Location: Hidden room with on the left ledge of the ravine. Satellite Dish Direction: Backward and slightly to the right. Directions: Go through the right path of the main hall. Follow the path. Turn right and follow the path until there is a room on the right. Upon entering the room follow the right path of the cave and then follow the cave forward until you reach two separating paths. Move to the end of the path and you will find a hidden ledge to the left. Follow the ledge until you reach a tunnel on the left. The Anchor is in there. Note: if it isn't there, then it is the other Anchor in coffin corner. You are already in the right area, just refer to the location above.
Location: Room outside the Minecart track on the left side. Satellite Dish Direction: Forwards and slightly to the right. Directions: Go through the left path of the main hall. When you reach the caves, follow the left one until there is a cave on the left. Go past the cave and enter the path on the path on the left. Enter the first room on the right and the Anchor should be there. Note: There is the same shortcut to exit this area as Anchor B, Location 2.
Location: Anchor in open cave upstairs. Satellite Dish Direction: Forwards and up. Directions: Find the staircase that exits on the left side of The Nest. (It's different every time) Go forward and to the right to get to a door. Enter the door and the Anchor should be right there. Note: This is one of the most dangerous Grumble spot as the Anchor is in the open.
Location: Center side room upstairs. Satellite Dish Direction: Backwards, Up, and Right. Directions: Find the staircase that exits on the right side of The Nest. Go forward and past both caves. Once you pass both caves take the next path to the left. The Anchor room will be on the left.
Location: Mossy Greenhouse Room upstairs Satellite Dish Direction: Backwards and very high up Directions: Find the staircase that exits on the right side of The Nest. Go forward and to the right. Use the Shears on the vines. Don't have shears? Pass the vines and take the cave to the right. follow the cave all the way around until you reach the other side of the vines on the right. Go into the room and climb to the top of the ladder. The Anchor will be there.
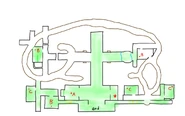
Location: Upstairs coffin corner Satellite Dish Direction: Forwards Directions: Find the staircase that exits on the left side of The Nest. Take two lefts and go around the cave loop. Once you reach the end go into the left pathway and take the first room to the right. The Anchor will be in there. For more information see the anchor maps in the gallery. |
Anchor Code
Use this chart to find the code of the Anchor
First find the row that contains the offset number then use the row to convert the numbers accordingly.
|
|
 Spawn Locations
Singleplayer
- Anchor A will always spawn behind the transmitter on the first floor.
- Anchor B has 3 possible spawn locations, all on the first floor.
- Anchor C has 3 different possible spawn locations on the first floor and 1 on the second.
- Anchor D has 3 possible spawn locations, all on the second floor.
Multiplayer
- Anchor E Has a randomized spawn location (all from anchor D, second floor)
- Anchor F has the same conditions as Anchor E.
Anchor A-D all have separate spawn locations with there being 11 in total. Each anchor possible spawn is unique meaning it's for one letter only (For example, a B anchor can't spawn in a C spot).
Anchors E and F take spawn locations of the other 2 Anchor D spawn locations that weren't taken.
 Trivia
- The model for the Anchor has been leaked in the past with the name of Nest Anchor.
- The final anchor always has a broken screen, meaning the player cannot be sure of what they input.
- In singleplayer, this will always be the D anchor. In multiplayer, it may be the E or F anchor depending on the player count, which determines the number of Anchors.
- Anchor A is always in the same place, in the same room as the console, behind the transmitter, while the rest have random locations.
- Anchors may have a note on them with a "+" or "-" sign, meaning the Keypad is shifted. For example, if the code is 782, and the note says + 2, the player must click 904 for the code to show up correctly.
- If the code numbers exceed 9 or 0 after being added/subtracted with the offset number, they should loop back to 9 or 0. For example, 158 +5 should be 603 and 324 -5 should be 879.
- Anchor C is the only anchor with 4 spawn locations across two floors.
- Anchors D, E, and F are all on the second floor.
- The lowest combination code that can happen is 000, However this is very rare.
- The Transmitter's ping noise is the Anchor's ping noise slowed down.
- Anchor C is also the only anchor to be able to spawn in an unsafe area. However Grumbles only attack once and move on if the player is typing the code.
- The camera will zoom out when attacked by a Grumble while doing this anchor. It is unknown if this is a glitch or not.
 Related Achievements
|
Trespassing
|
 Gallery


