The Gemesaur King is the boss of the Dark Palace in A Link Between Worlds[1], and is one of the seven bosses in which the Player(s) can fight in any order during the second act of the game. As it's name suggests, the Gemesaur King is based on the Helmasaur King from A Link to the Past in both name and appearance.
Characteristics
The Gemesaur King's lair, deep within the Dark Palace, is a compact, rectangular room with unlit Torches in the northwest and southeast corners. When Link lights these Torches using the Lamp or the Fire Rod, a series of candles along the surrounding walls will light up, and the Gemesaur King appears by falling from the ceiling.
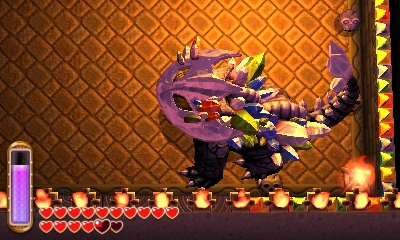
The lizard-like beast wears a protective mask and body armor covered in various colored crystals, and will begin the battle by stalking Link around the room in an agile fashion, occasionally stopping to swing its tail around and, with a roar, fire three crystals from it in a spread-shot. Link can only damage the beast by throwing Bombs at its mask, or alternately by throwing the Skulls scattered around the room, which are less damaging. If any of the crystals on its body are struck by these items, they will fall off as Rupees.
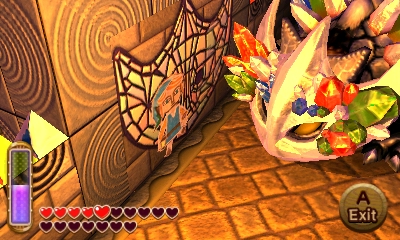
Once the Gemesaur King's mask has sustained enough damage, it will crack and fall off along with the body armor, showering the floor with Rupees and revealing the beast's pulsating forebrain, which acts as its weak spot. The Gemesaur King will attack Link in the same manner as before, though with increased speed, and firing five crystals at once from its tail. It will also bite at Link if he stands too close to its head.
After suffering several hits to the head, the Gemesaur King will roar loudly, shaking the room and snuffing out all of the candles and Torches. The beast takes on a semi-transparent, phantom-like form which can be difficult to see in the dark, save for the traces of light from its glowing eyes. Link must reignite both Torches while it dashes wildly around the room's perimeter, attempting to trample him. Restoring the room's light causes the Gemesaur King to reappear, becoming vulnerable for several seconds and resorting to its previous attacks, before it extinguishes the lights again. Once the Gemesaur King is defeated, a Heart Container will appear, and a replica of its mask hanging on the north wall will shatter, revealing the Painting of Gulley.
Nomenclature
The name Gemesaur King is based on the Helmasaur and likely refers to the many crystal gems covering its mask and body.
| Language | Name | Meaning | |
|---|---|---|---|
| Japanese | ジュエルロック (Juerurokku) | Jewel Rock | |
| French | Roi Gemesaur | King Gemesaur | |
| German | Maskenkönig | Mask King | |
Gallery
-
 Link Wall Merging in front of the Gemesaur King
 -
 The Gemesaur King without its armor

Trivia
- Being based on the Helmasaur King of A Link to the Past, the Gemesaur King shares a platter of similarities to that boss. They are both gigantic quadrupedal monsters that resembles a dinosaur-like creature and have the words "Saur" and "King" in their names, they both appear during the Second Act of their respective games, both serves as the main boss of their respective dungeon that is themed on Darkness and both ultrize both projectiles and physical combat as a means of attack, as well as use their tails as a means of attack. Additionally, their strategy are similar, with Link having to use Bombs in order to destroy their masks as to make them vulnerable to damage on their heads.
- Despite their similarities, however, both the Helmasaur King and the Gemesaur King both share a number of opposite traits that make them stand out on their own:
- The Helmasaur King is a boss that is required to beat as the first boss of the Second Act, it use its tail for physical attacks, fights physically with only its tail, launches projectiles from its mouth that split into smaller projectiles and are fired horizontally, and uses both attacks in both phases of the battle.
- The Gemesaur King, however, is a boss that can be fought in any order the Player(s) chose, it uses it's tails for projectile attacks, fights physically by both biting in close-rage and charging, launches projectiles from its tail that is fire in a spread shot and is fired in a straight, and mainly uses its crystal projectiles as its means of attack during the first phase.
- Despite their similarities, however, both the Helmasaur King and the Gemesaur King both share a number of opposite traits that make them stand out on their own:
References
- ↑ Encyclopedia, Dark Horse Books, pg. 179
Mazura · Jermafenser · Rebonack · Carock · Gooma · Barba · Thunderbird ![]() · Link's Shadow
· Link's Shadow
Light World
Ball and Chain Trooper ![]() · Six Armos Knights · Lanmola Trio · Moldorm · Agahnim
· Six Armos Knights · Lanmola Trio · Moldorm · Agahnim ![]()
Dark World
Helmasaur King · Arrghus · Mothula · Blind the Thief · Kholdstare · Vitreous · Trinexx · Ganon
Super Helmasaur · Super Arrghus · Super Mothula · Super Blind · Dark Links![]()
Bosses
Moldorm · Genie · Slime Eye · Angler Fish (2D) · Slime Eel · Facade · Evil Eagle (2D) · Hot Head · Shadow Nightmares
Sub-Bosses
Rolling Bones ![]() · King Moblin
· King Moblin ![]() · Hinox
· Hinox ![]() · Dodongo Snakes x2
· Dodongo Snakes x2 ![]() · Lanmola
· Lanmola ![]() · Cue Ball
· Cue Ball ![]() · Master Stalfos x4 · Gohma Twins · Armos Knight
· Master Stalfos x4 · Gohma Twins · Armos Knight ![]() · Smasher
· Smasher ![]() · Grim Creeper · Turtle Rock · Blaino
· Grim Creeper · Turtle Rock · Blaino
Bosses
Gohma · King Dodongo · Barinade · Phantom Ganon · Volvagia · Morpha · Bongo Bongo · Twinrova · Ganondorf · Ganon
Sub-Bosses
Lizalfos · Big Octo · Stalfos · Meg · Flare Dancer · White Wolfos · Dark Link · Dead Hand · Gerudo Thief · Iron Knuckle · Dynalfos
Bosses
Odolwa · Goht · Gyorg · Twinmold · Majora ![]()
Sub-Bosses
Dinolfos · Gekko · Wizzrobe · Gerudo Pirate · Wart · Gekko and Mad Jelly
Captain Keeta · Iron Knuckle · Sharp · Igos du Ikana · Garo Master · Gomess · Eyegore
Bosses
Aquamentus · Dodongo · Mothula · Gohma · Digdogger · Manhandla · Gleeok · Medusa Head · General Onox ![]()
Sub-Bosses
Brother Goriyas · Facade ![]() · Omuai · Agunima · Great Moblin
· Omuai · Agunima · Great Moblin ![]() · Syger · Vire
· Syger · Vire ![]() · Poe Sisters · Frypolar
· Poe Sisters · Frypolar
Bosses
Pumpkin Head · Head Thwomp (2D) · Shadow Hag · Eyesoar · Smog · Octogon · Possessed Nayru · Plasmarine · Ramrock · Veran ![]()
Sub-Bosses
Giant Ghini · Swoop · Subterror · Armos Warrior · Great Moblin ![]() · Smasher · Vire
· Smasher · Vire ![]() · Angler Fish (2D) · Blue Stalfos
· Angler Fish (2D) · Blue Stalfos
Bosses
Gohma · Kalle Demos · Gohdan · Helmaroc King · Jalhalla · Molgera · Puppet Ganon ![]() · Ganondorf
· Ganondorf
Sub-Bosses
Green Bokoblin · Moblin · Mothula · Darknut · Cyclos · Phantom Ganon · Stalfos · Wizzrobe · Mighty Darknut · Big Octo![]()
Bosses
Phantom Ganon ![]() · Stone Arrghus · Helmaroc King · Big Poe · Big Moldorm x2 · Frostare · Vaati · Ganon
· Stone Arrghus · Helmaroc King · Big Poe · Big Moldorm x2 · Frostare · Vaati · Ganon
Sub-Bosses
Chief Soldier · Shadow Link ![]() · Manhandla · Dodongos · Big Dark Stalfos · Gohma · Big Dodongo
· Manhandla · Dodongos · Big Dark Stalfos · Gohma · Big Dodongo
Bosses
Big Green Chuchu ![]() · Gleerok · Mazaal · Big Octorok
· Gleerok · Mazaal · Big Octorok ![]() · Gyorg Pair · Vaati
· Gyorg Pair · Vaati ![]()
Sub-Bosses
Madderpillar ![]() · Dark Nut · Big Blue Chuchu
· Dark Nut · Big Blue Chuchu ![]() · Red Dark Nut · Black Knight
· Red Dark Nut · Black Knight
Bosses
Diababa · Fyrus · Morpheel · Stallord · Blizzeta · Armogohma · Argorok · Zant · Puppet Zelda · Ganon · Ganondorf ![]()
Sub-Bosses
Ook · King Bulblin · Dangoro · Twilit Carrier Kargarok · Twilit Bloat · Deku Toad · Death Sword · Darkhammer · Darknut · Aeralfos · Phantom Zant
Bosses
Stagnox · Fraaz · Phytops · Cragma · Byrne · Skeldritch · Demon Train · Chancellor Cole · Malladus
Stagnox II · Fraaz II · Phytops II · Cragma II · Skeldritch II · Dark Link![]()
Sub-Bosses
Mothula · Geozard · Rocktite · Ice Keese · Freezard · White Wolfos · Geozard Chief · Big Blin ![]() · Snapper · Helmet Chuchu · Metal Chuchu · Stalfos · Heatoise · Stalfos Warrior · Gerune · Ergtorok ·
· Snapper · Helmet Chuchu · Metal Chuchu · Stalfos · Heatoise · Stalfos Warrior · Gerune · Ergtorok ·
Bosses
Ghirahim ![]() · Scaldera · Moldarach · The Imprisoned
· Scaldera · Moldarach · The Imprisoned ![]() · Koloktos · Tentalus · Levias
· Koloktos · Tentalus · Levias ![]() · Bilocyte
· Bilocyte ![]() · Demise
· Demise
Sub-Bosses
Stalfos · Lizalfos · Stalmaster · Moldarach · LD-002G Scervo · Dark Lizalfos · Magmanos · Moldorm · Dreadfuse
Bosses
Yuga ![]() · Moldorm · Margomill · Gemesaur King · Arrghus · Knucklemaster · Stalblind · Zaganaga · Dharkstare · Grinexx · Yuga Ganon
· Moldorm · Margomill · Gemesaur King · Arrghus · Knucklemaster · Stalblind · Zaganaga · Dharkstare · Grinexx · Yuga Ganon
Sub-Bosses
Armos · Red Stalfos · Heedles · Green & Red Goriyas · Gigabari · Gibdos & Purple Mini-Moldorms · Red Eyegores · Flying Tiles & Devalants · Big Pengator & Pengators · Fire Gimos · Moldorm · Lorule Ball and Chain Soldier · Arrghus
StreetPass bosses
Bosses
Margoma · Arrghus · Moldorm · Blizzagia · The Lady's Pets ![]() · Stalchampion · Prismantus · The Lady
· Stalchampion · Prismantus · The Lady
Shadow Link x3![]()
Sub-Bosses
Electric Blob King · Electric Blob Queen · Hinox Brothers · Freezlord · Vulture Vizier · Grim Repoe · Gigaleon
Bosses
Windblight Ganon · Fireblight Ganon · Master Kohga · Thunderblight Ganon · Waterblight Ganon · Calamity Ganon · Dark Beast Ganon ![]()
Sub-Bosses
Stone Talus · Igneo Talus · Frost Talus · Molduga · Hinox · Blue Hinox · Black Hinox · Stalnox · Igneo Talus Titan · Molduking
Bosses
Colgera · Mucktorok · Marbled Gohma · Queen Gibdo · Phantom Ganon · Seized Construct · The Demon King's Army · Demon King Ganondorf · Demon Dragon ![]()
Sub-Bosses
Flame Gleeok · Frost Gleeok · Sludge Like · Thunder Gleeok · King Gleeok · Yunobo · Frox · Flux Construct · Moragia · Molduga · Hinox · Stalnox · Frost Talus · Igneo Talus · Stone Talus · Battle Talus · Stone Talus (Luminous) · Ganondorf · Master Kohga · Phantom Ganon