Please improve it as you see fit. Editing help is available.
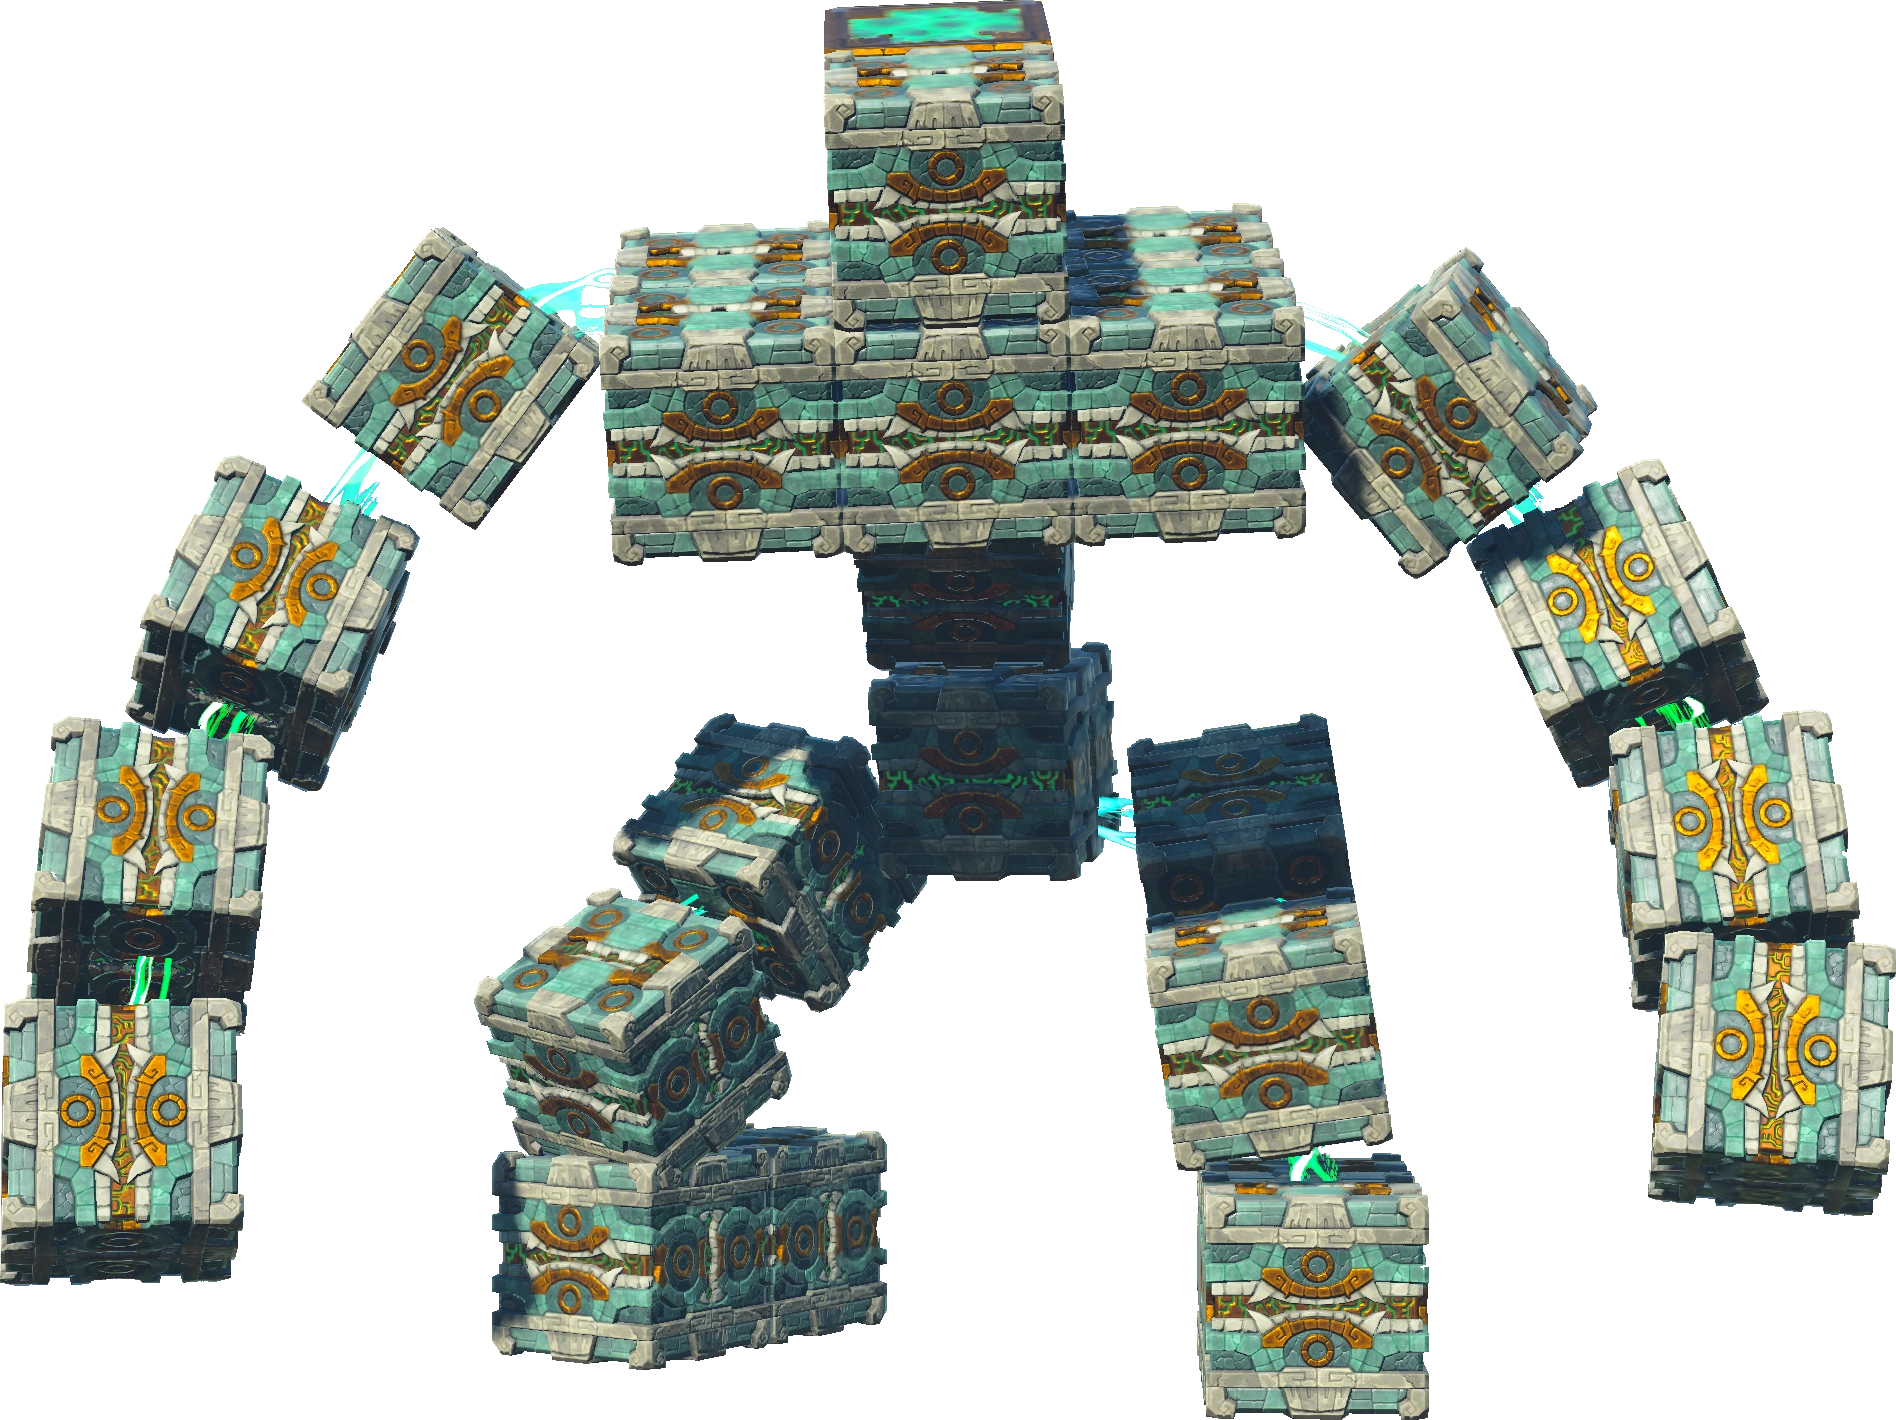
The Flux Construct is an Overworld boss that appears in Tears of the Kingdom. It appears on floating sky islands and in The Depths. It is made of Zonai blocks that are connected together via Zonai magic. It is defeated by destroying its core, which glows green. They have three different levels: I, II, III.
Characteristics
Flux Construct I

The first iteration of the Flux Construct is a beginner-level overworld boss. It has two forms: Golem Form and Hover form. The Flux construct starts off in its Golem form, capable of slamming down with one or both hands. If faraway, the Flux construct can teleport to Link's position and proceed to slam with both their hands.
The weak point is its core. Their cores are usually on an exposed position such as their hands or on their feet, making it easier for Link to strike it with melee weapons. Once it takes enough damage, the cubes will scatter and leave the core vulnerable for a limited time before it reassembles. Alternatively, Ultrahand can be used to detach the core from the main body.
After reassembling, it will go into Hover form, a flattened arrangement of cubes with its core on top. Its only attack is launching a series of cubes at Link, inflicting physics-based collision damage based on the speed of the cubes. The hover form is usually at low elevation and its core is often exposed underside for easier shot with the bow. Like the golem form, if the cube takes enough damage from the bow, it will scatter and become vulnerable. Once it regenerates it will return to its Golem form and repeat the process until death (its or the player's).
Flux Construct II
Flux Construct introduces a new form: Cube. A 3x3 dimensional cube that will roll in an attempt to trample Link. It will roll at a steady pace, but may sometimes speed up if Link is close by. Sometimes it may jump and slam over to Link while rolling.
Along with its basic forms, there are a few distinct differences. The Golem form's core is primarily located behind the golem's torso for better protection, as well as its Hover form having a higher elevation out of Link's reach. Finally, if you are directly between its legs in Golem form, it will stand on its "heels" and stomp around. The filler cubes in any form can be pulled out to clear a way for the core to be struck.
To expose their core, it must be pulled out manually with the Ultrahand ability or damaged. Once the core has been pulled out, it will scatter and become vulnerable, exactly as level I.
If the core somehow falls off the arena, the cube will instantly regenerate and return to the fight area.
Sometimes undefeated second models may have a treasure chest attached to them.
Flux Construct III
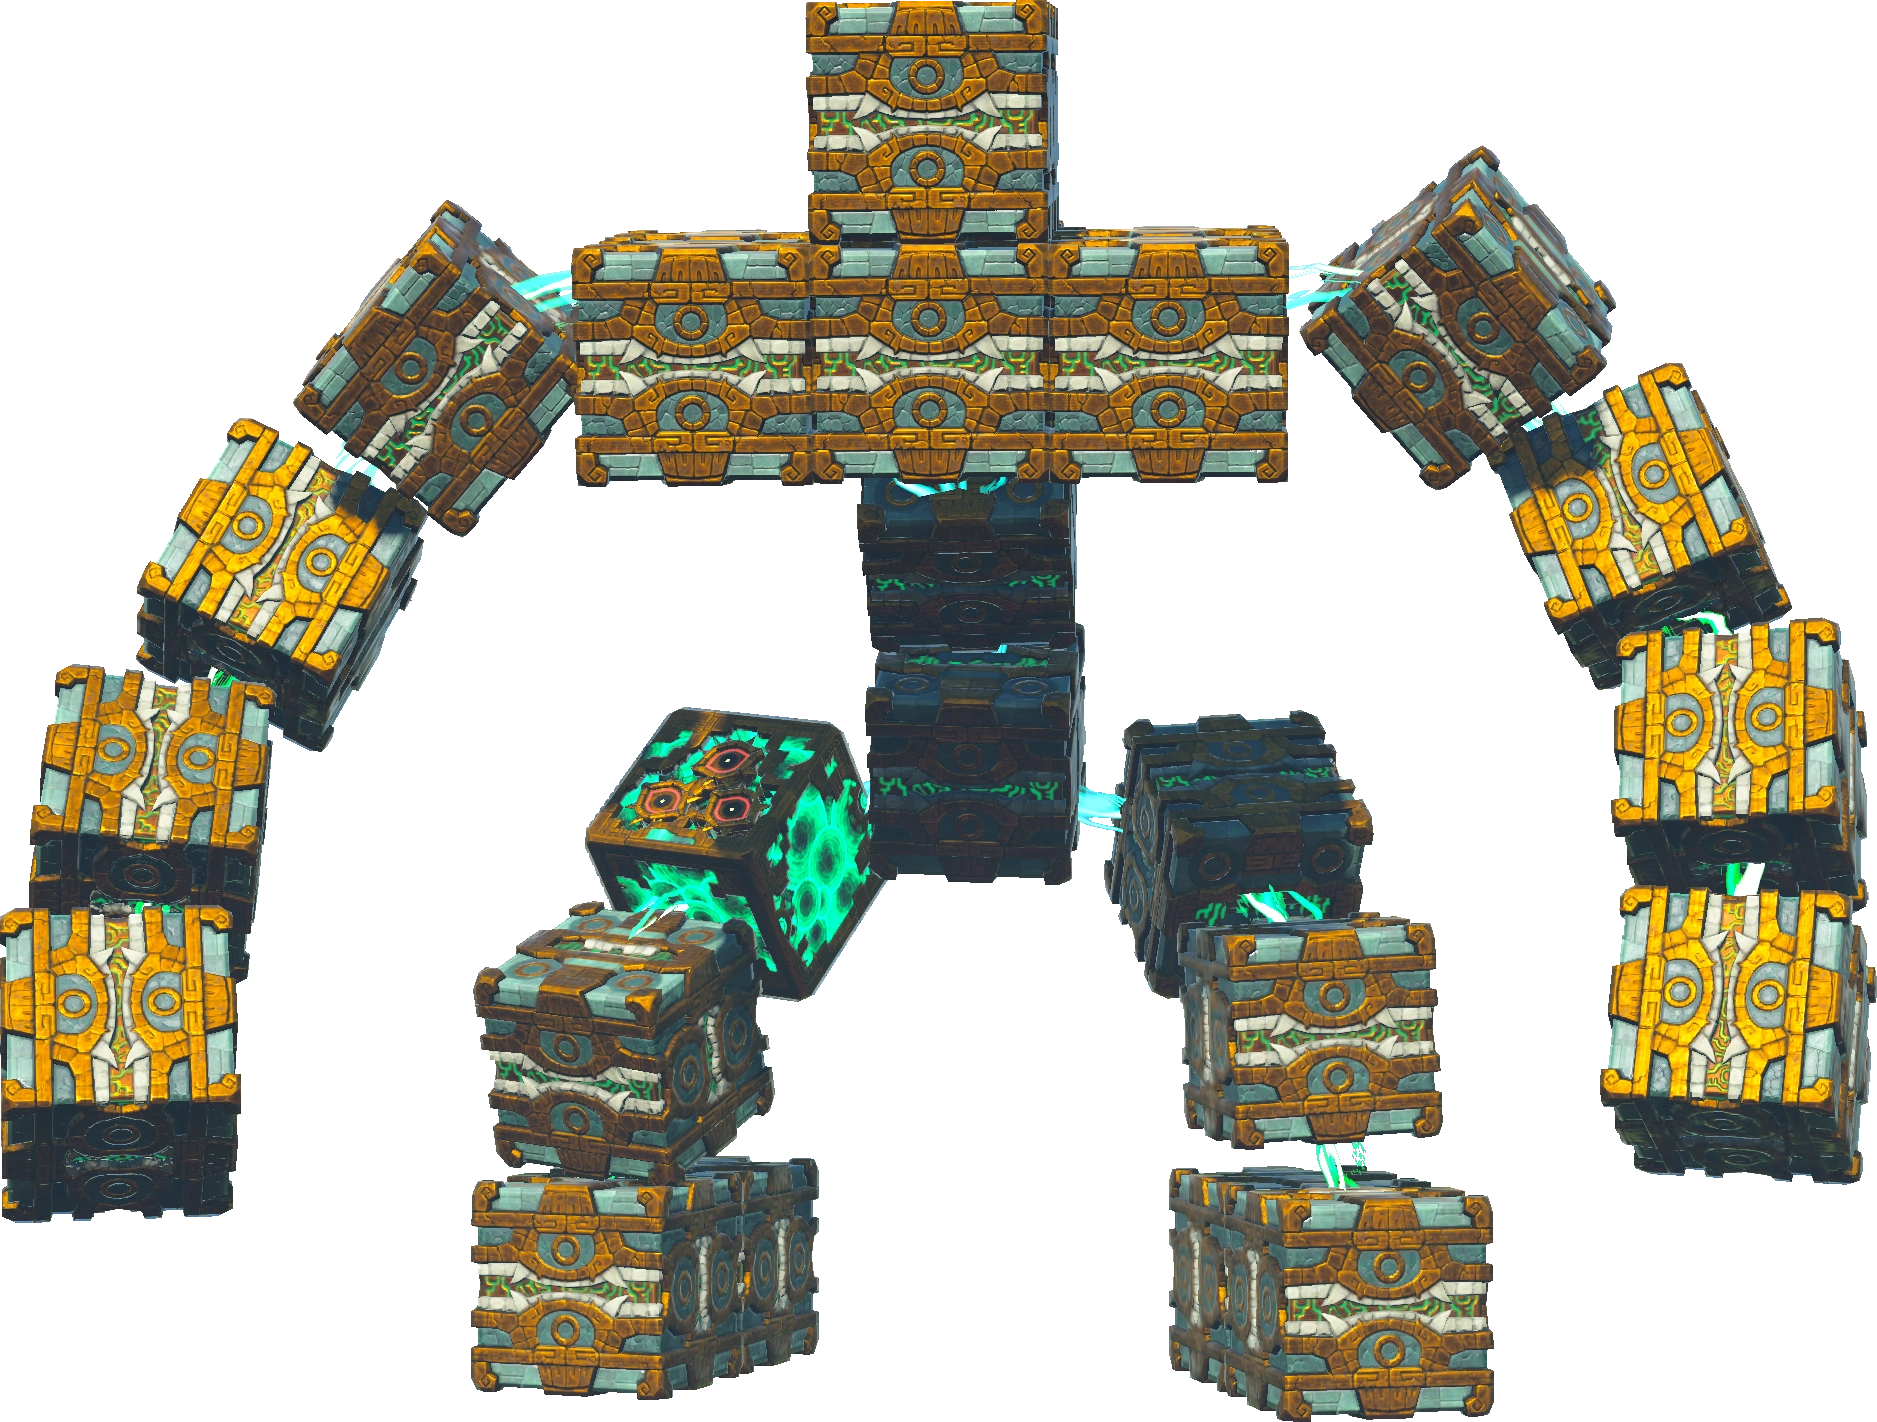
The third model has gold-colored trims around their cubes. The only change from the second version is the Golem form will follow up its single-handed slam with the teleport slam.
In addition, the third model has the ability to switch its core around to prevent it from being targeted. Every time the core is aimed at, it will shift around and repositioned in a way where Link cannot shoot arrows at it (ie: behind their torso). It will not shift to a more vulnerable position such as their arms or legs in their Golem form. Along with its shifting ability, it also has the ability to recover detached cubes.
Like the second model, the core must be pulled out with Ultrahand to expose it. But due to its shifting ability, trying to grab the core will cause the Ultrahand's grasp to almost disengage. To pull out the shifting core, the construct must be stunned by shooting its core with a Bow. It will continuously keep shifting when aimed at, but quick reflexes might be able to make short work of it. Pulling the other cubes to expose the core will make it easier to aim at.
Like the second iteration, undefeated third models may have a treasure chest attached to them.
General
Before the Flux Construct has been defeated, you can fuse any non-core segment to a weapon or shield, adding 4 attack damage and giving it the "Hammer" weapon type.
Once the Flux Construct has been defeated, it will drop a Flux Core which can be fused to a weapon for a large power increase. It will also drop a few Regular and Large Zonai Charges and capsules with Zonai Devices.
Strategy and tactics
Because the cubes making up its body are able to be grabbed by your Ultra hand ability, it is recommended that you grab the core and pull it away from the main body or pull away as much blocks as you can. This will cause it to fall apart, giving you an opportunity to deal damage to the core. This stagger state only lasts for a while, however, and after it recovers, it will transform and begin attacking again.
When the Construct is in its Hovercraft Form, the cubes that it launches at you can be recalled and climbed. You can use this to climb onto one of the launched cubes, then use your Recall ability to ride the cube all the way up to the Construct. This can prove useful when the core is on top of the hovercraft and not easily hit.
In its Cube Form, you can use a Fan to get into the air and make use of Bullet Time (Occuring when you draw your bow above a certain distance above the ground), allowing you to more easily hit the core when it exposes itself.
When the core is out of reach or difficult to attack, throwing bombs or using a cannon twice on any part of its body will cause it to collapse.
Attack patterns:
The Flux Construct has three main attacks, which it will repeatedly use until defeated.
Golem form
In this form, it will slowly make its way to Link's location, then transport itself directly in front of him, before smashing its fists into the ground and creating a shockwave that does a high amount of damage. It is relatively easy to avoid this attack by simply running from the construct's range before it strikes. Link can also pull off the cubes at the end of its "limbs" to prevent it from damaging him completely.
Cube form
Its next attack consists of it transforming into a cube, where it will attempt to crush you, gradually speeding up as it approaches. In this form, it is very easy to avoid.
Hovercraft form
Its final attack is where it will transform into a saucer-like craft, floating above the ground. It will attack in two ways depending on range:
Close range:
If close enough, it will detach five cubes from its body and launch them all at once at you.
Mid range:
If it is far enough from your location, it will detach five cubes, like the previous attack, but this time it will launch them one at a time towards you. Both of these attacks deal considerable damage, so it is important to not get hit.
Trivia
Nomenclature
| Language | Name | ||
|---|---|---|---|
| This table was generated using translation pages. | |||