"So you're sure there's a secret facility is here?"
"Officially, this place is a travel agency"
"So?"
"A travel agency. In 2017
In a penthouse suite"
"...Alright, point taken"
― The Freelancer and Jackdaw
The SCRS, or Le Service Canadien du Renseignement de Sécurité, was released on February 25th, 2020, with every difficulty. It was the twelfth mission to be released; this is also the penultimate mission to be played and is the fourteenth mission chronologically. In English, it is called the CSIS, or Canadian Security and Intelligence Service.
Overview
"Our primary target is one of Halcyon's bunkers. It's highly secured and kept secret from most of the organization, and we're going to need details on that facility to plan our strike. So, today, we're getting those details from the bunker's previous owner - The Canadian government. Welcome to Le Service Canadien du Renseignement de Sécurité"
― Mission briefing from Jackdaw
The Freelancer is sent to Toronto by Jackdaw to infiltrate the Canadian Security Intelligence Service and retrieve plans for a bunker that Halcyon purchased from the Canadian government.
The map is on the top penthouse floor of a Toronto high-rise. The whole floor is covered by offices and workrooms. The map is split into two sections: the front office, which is disguised as a travel agency, and the main office behind, which is where the CSIS works.
The front part is made up of an elevator area, a reception desk, multiple office cubicles, some meeting rooms, a break room, and two doors which lead to the main offices of the CSIS. Behind each door is a weapon scanner that will set off an alarm if any weapons are detected. The door on the far right is the main access point, which features a chip-access door with 2 guards monitoring the checkpoint. The leftmost side is a locked door that must be breached or unlocked, and leads to a small storage room.
The back area is an expansive office section with many rooms, hallways, office tables, and a big outside area. Most of the connected rooms are filled with desks with PCs, shelves and plants. The many NPCs which roam the area will sit on chairs, work at desks, or just stand at certain locations. There is a big outside area with tables and chairs, bushes, benches, and a tree. At the edge, there is also a helipad. The left side of the building also has a small walkway which is located outside. The outside areas all have very dark floors and walls in addition to black cameras.
The main office is significantly larger than the front office. The main office includes 4 server rooms, a large central office area on the west wing, a wide hallway, a large storage section in the middle, a large outdoor terrace with tables, foliage and a helipad, and a small hallway on the east wing, where only agents and the lead tech member can enter.
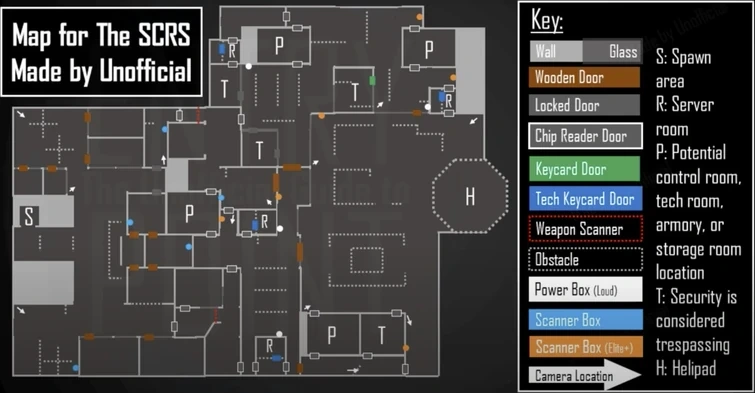
Inside there are 4 special types of rooms, with their locations being randomized each game. There is the control room, tech room, armory and storage room. The control room includes a few tables with some weapons, as well as some computers. It is operated by 3 security team members, who control the security cameras and the security team protocol check. Taking out all the operating security members will neutralize both the security check objective and the cameras. The tech room has 2 tech workers and a safe with a high-security keycard, which can be used to access server rooms. The armory has 3 first aid kits, 3 K45s, 4 CBR-Cs, 3 microcams, 4 grenades, 4 blocks of C4 and 1 blowtorch. The storage room features multiple boxes and shelves, none of which can be interacted with except for the chest in the back, where bodies can be stored. Agents, Security, and the lead tech will sometimes go through these rooms. In the hallway on the east wing, further down the hallway there is a small room where only agents will enter, which is generally the safest place to take agents out. There is also an agent's office, accessible by keycard, which is dropped by both Agents. There is a wall safe behind the leftmost painting in the agents' office, which contains a Raven (found on any difficulty) and a USB (Only Rookie-Elite).
NPCs
Stealth
There are 6 different NPCs in the mission: Janitors, Security, Tech, Analysts, Hemlock and Nightshade.
Janitors are hidden security guards who roam the front area. They do not go into the back area or elevator area. Their disguise has access to the two doors which lead to the back and to the small areas which are after that. They cannot be detected by Analysts, Tech, and Security, except for the Security in the checkpoint at the right side of the front area. Compared to most other NPCs, they have a very small range where they can be held up.
Security roam the back area and will respond to any broken or disabled cameras. Their disguise has access to every door, but they are considered trespassing at the server rooms and tech room. The disguise will not be detected by Tech, Analysts or Janitors, and it allows you to hold guns, wear armor, and carry bags. Taking out a security guard will give you the Security Protocols objective, unless the security was from the control center. The first security guard taken out will initiate a 10-minute timer, after which the control room guards get alerted. Taking out another security guard will reduce the timer to 5 minutes, then 2.5, than 1.25, etc. This is done regardless of the current time remaining, so taking out a second security guard with 9 minutes and with 6 minutes remaining would both set the timer to 5 minutes. If the timer would be set to a value higher than the current time, such as taking out a second security guard with 4 minutes left, the timer will not be affected. Taking out a third security guard would still reduce the timer to 2.5 minutes. Taking out Hemlock or Nightshade or guards assigned to the control room will not start or affect the timer.
Hemlock and Nightshade are agents who can roam both the inside and outside portions of the back area. They can detect any disguise and will detect players more easily than security. One of them will carry a USB, which is needed to grant authorization for the third server hack in stealth. You cannot disguise as either of them and you cannot intimidate them.
Guards in this mission are aggressive guards, which means they will always pull out their gun when fully alerted.
Tech are civilians who roam the working areas. They wear a blue uniform and have a special Tech room where two techs and a high-security card can be found in a safe. Additionally, there is also a lead tech who carries a high-security card. Their disguise allows access to the server areas, will not get detected by Analysts, and is detected slower by Security.
Analysts are civilians who wear grey clothing and roam the work areas. Their disguise will not get detected by Tech and is detected slower by Security.
| Rookie | Professional | Operative | Elite | Legend | |
|---|---|---|---|---|---|
| Janitors | 3 | 3 | 3 | 4 | 4 |
| Security (Inside) | 5 | 5 | 5 | 5 | 5 |
| Security (Outside) | 4 | 4 | 4 | 4 | 4 |
| Security (Control room) | 3 | 3 | 3 | 3 | 3 |
| Security (Security checkpoint) | 2 | 2 | 2 | 2 | 2 |
| Tech | 3 | 3 | 3 | 3 | 3 |
| Tech (Tech Room) | 2 | 2 | 2 | 2 | 2 |
| Analyst | 11 | 12 | 13 | 14 | 15 |
| Hemlock | 1 | 1 | 1 | 1 | 1 |
| Nightshade | 1 | 1 | 1 | 1 | 1 |
Loud
During loud, the assaulting enemies are ETF. They will spawn at the edges of the map and above the skylights, and will breach any door to get to players. After finishing all hacks, a Halcyon gunship will appear at the escape. At 50% health, it will shoot a missile which kills the player instantly if they are hit by it without cover. When it reaches zero health, it will shoot a second missile and then retreat.
Hemlock  & Nightshade
Hemlock and Nightshade are two special NPCs. They are Canadian agents who will detect every disguise and carry a Raven and a keycard. One of them also holds a USB stick which is required for completing an objective during stealth. They also have a chance to respond to broken/disabled cameras. Similar to Halcyon Operatives from The Scientist, Hemlock and Nightshade cannot be taken hostage nor have their disguises taken. On Legend difficulty, it is required to knock them out as the safe USB does not spawn.
Mission Progression
The main objective of the mission is to hack 3 server rooms. Stealth and Loud are very similar to each other, with a few minor differences.
Stealth
"Try to keep things quiet if you can. We'll be better off if Halcyon never hears about this"
― Jackdaw
The stealth objectives are simple, but a lot has to be done to complete them. First, you can obtain a high-security card from the safe or lead tech, which requires you to pacify the lead tech or take out the tech room and open the safe inside (alternatively, you can skip this step if you have a silent drill, blowtorch, or breaching charge). After that is done, you can open the server room doors and hack them, which does not require the player to be a Hacker. The first hack will stop at 50%, and you have to confirm it at an analyst's desk, which is suspicious with any disguise. The second hack will be investigated by a security guard or agent if the control room hasn't been taken out yet. The third hack will stop at 50% and requires a USB to complete. It can be obtained from one of the agents, or from the agents' office, where it is behind a painting in a wallsafe (except on Legend difficulty). After the third hack is done, you can exfiltrate back at spawn.
Additionally, the weapon scanners can be instantly disabled by rewiring the power box with the same wire color as the weapon scanner, the location of the power box is determined by difficulty. Hacking the computer in the security checkpoint area with a Hacker will also disable the metal detectors however it takes 1 minute and 30 seconds (affected by ![]() Speedhack perks) for the hack to be completed.
Speedhack perks) for the hack to be completed.
Loud
"I'm hearing alarms"
"It's under control"
"You sure?"
"Absolutely not"
― Jackdaw and The Freelancer
Loud is almost the same as stealth. You first have to obtain a high-security card to get into the server rooms, however, they can also be breached with explosives, drills, and blowtorches. To obtain the keycard, either pacify the lead tech or get the card from the safe in the tech room. The first and third hacks will take 1 minute to complete, while the second hack will take 1 minute and 30 seconds. You will have to defend the power box near the terminal from the ETF, which will try to disable it to halt the hack. Once all 3 hacks are done, a Halcyon gunship appears, which you will have to take out. Initially, the gunship will be unable to go below 50% health. After reaching 50% health, it will gain invincibility and shoot a missile that deals up to 300 damage to players in a large radius, dealing less damage the further the player is. About 1 second after the missile detonates, it will become vulnerable again, and it's health will be able to drop to 0. When it reaches 0 health, it will shoot a second missile and then retreat. The second missile deals the same damage in the same radius as the first one. Then, you can escape at the helipad via Sparrow's helicopter.
Objectives
International Espionage (Stealth)
- Obtain a keycard from the tech
- Access one of the server rooms
- Complete the hack
- Authorize the connection
- Find another access point
- Complete the hack
- Find another access point
- Get an agent's USB
- Exfiltrate
Intel: Weapon Scanners
- The scanners will trigger an alarm if they detect any guns
- Kill them by disabling, the box with the red/blue wire
Intel: Security Protocols
- You've interrupted the Security Team Check Protocols
- Neutralize the Control Room or they will raise the alarm
International Espionage (Loud)
- Obtain a keycard from the tech
- Access one of the server rooms
- Complete the hack
- Find another access point
- Complete the hack
- Find another access point
- Complete the hack
- Wait for Sparrow (if previous objectives were in stealth)
- Deal with the gunship
- Exfiltrate
Rewards
| Rookie | Professional | Operative | Elite | Legend | |
|---|---|---|---|---|---|
| XP | 10,000 | 15,000 | 20,000 | 26,000 | 35,000 |
| Bonus XP (No alarms + no kills) | 2,000+2,000 | 3,000+3,000 | 4,000+4,000 | 5,200+5,200 | 7,000+7,000 |
| Contract | $3,000 | $4,000 | $5,000 | $7,500 | $10,000 |
Badges
- Primary Target - Complete "The SCRS"
- Professional Agent - Complete "The SCRS" on Operative or above without setting off the alarm
- Ringing The 416 - Complete "The SCRS" on Legend without killing anyone or setting off the alarm
Soundtracks
- Stealth - https://www.roblox.com/library/1838641186/Unusual-Suspect
- Loud - https://www.roblox.com/library/1842559618/Hijacked
- Loud Alternate - https://www.roblox.com/library/1842940420/We-Go-Hard
| Training Missions | The Freelancer - The Killhouse |
|---|---|
| Story Missions | The Deposit - The Financier - The Withdrawal - The Blacksite - The Lakehouse - The Scientist - The SCRS - Black Dusk |
| The Auction - The Gala - The Cache | |
| The Setup - The Lockup - The Score | |
| Other | Concept |