| M.S. Solar • Rhombus Square • Rhombus Dungeon |
| Rookie Harbor • Autumn's Rise • Autumn's Fall |
| Bergen Trail • Bergen Village • Temple Mine |
| Maroon Valley • Ba'kii Kum • Faj'ro Temple |
| Gaia's Garden • Basin Keep • So'najiz Temple • Zir'vitar Temple • Grand Krys'kajo |
| Sapphire Ridge • Old Hideout |
| Vermillion Wasteland • Vermillion Dungeon • Vermillion Tower |
| Homestedt • Azure Archipelago • Ku'lero Temple |
Maroon Valley is a location in CrossWorlds. It is a large, dry, hot desert area that has multiple chasms and an oasis.
| Maroon Valley |
|---|
|
Maroon Valley is a dry and hot area located on the western side of the continent. The terrain is mostly eroded and some parts are under the constant grinding pressure of a sandstorm. The storm itself, however, is not a product of natural air movement. The scientists of Shadoon assume that some Ancient Technology causes it, as no other explanation could be found. Despite the harsh nature of the area there are some parts that fight back, such as the Maroon Oasis, which is filled with lush plantlife. To the west of the area one can find the home of the Shad tribe: Ba'kii Kum. |
| -Encyclopedia entry |
| Maroon Oasis |
|---|
|
The Maroon Oasis is a lush area found on the east side of Maroon Valley. It's filled with all sorts of plant and wild life and is crowned by a majestic tree which strongly resembles a maroon or cherry tree. But it bears no fruits and blossoms all year, leaving petals on the ground for animals to eat or people to gather. It is assumed that the tree itself is the reason the oasis still exists. Scientists who studied the tree found that it produces nutrients and channels them into the ground using the sunlight, something Maroon Valley has plenty of. |
| -Encyclopedia entry |
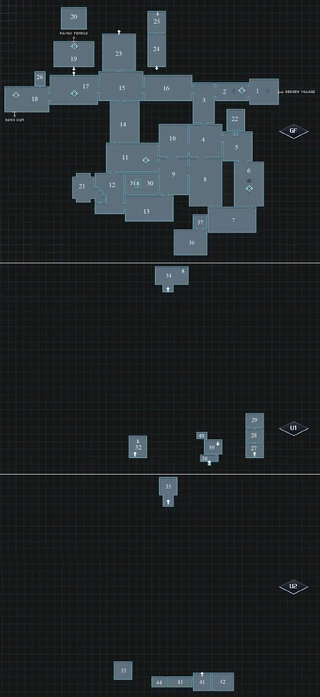
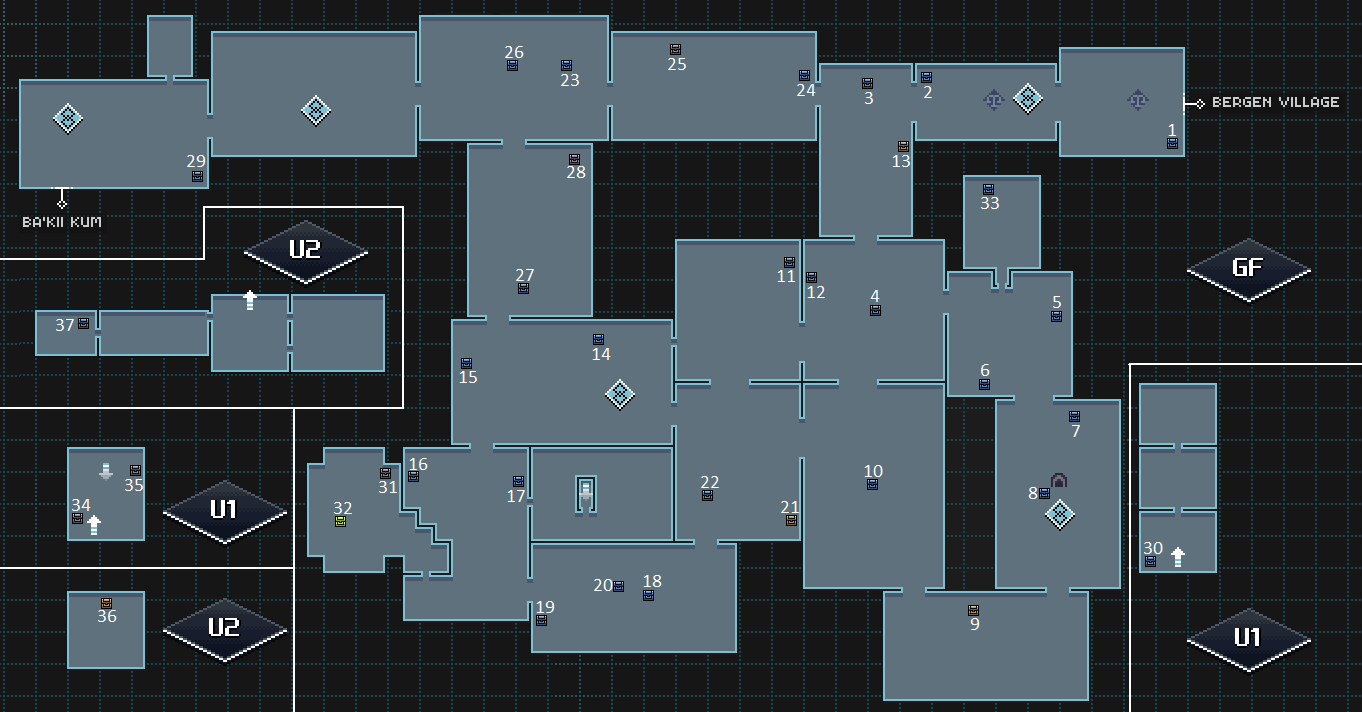
Layout
Maroon Valley is located in between Ba'kii Kum and Bergen Village. You can get there by leaving Bergen Village to the west. The area itself is complex and full of puzzles, with many areas being difficult to access. On the map below, the main path through the area is 1-2-3-4-(8/10)-9-11-14-15-17-18. All three other loops can only be unlocked in one direction (forward for the Maroon Oasis, and backward for the other two), and require completing numerous puzzles to proceed. River Cliff/Endless Pit in particular requires you to start in Barren Land and follow an upper, puzzle-filled path through Overpass to reach the areas.
Connecting Regions
The regions adjoining Maroon Valley are Bergen Village via Rising Railway, Ba'kii Kum via West Entrance, and Faj'ro Temple via Temple Entrance and Faj'ro Roof.
Rooms
Many of the side caves are only unlocked during specific quests. The Maroon Cave is unlocked during Maroon Tree Defender. The Toisecave is unlocked during Blasting Shells. The Windless Caverns and Barren Temple are unlocked during Hot Trail and Waves of Sand. The Brigand Cave is unlocked during Just Deserts. The Testing Area is unlocked during An unfortunate Series of Features. The Deadly Oasis and Cursed Temple require the ![]() Cursed Coin to reach. The secret lab is PC-exclusive, and is unlocked during Best in the West. The Temple Entrance is only accessible once the Faj'ro Temple is unlocked, and the Faj'ro Roof is reached after the temple is completed.
Cursed Coin to reach. The secret lab is PC-exclusive, and is unlocked during Best in the West. The Temple Entrance is only accessible once the Faj'ro Temple is unlocked, and the Faj'ro Roof is reached after the temple is completed.

| # | Room name | Floor |
|---|---|---|
| 1 | Rising Railway | GF |
| 2 | East Entrance
Landmark: East Entrance |
GF |
| 3 | Dusty Path | GF |
| 4 | Crossroad | GF |
| 5 | Vivid Path | GF |
| 6 | Maroon Oasis
Landmark: Maroon Tree |
GF |
| 7 | Bright Path | GF |
| 8 | Long Piece | GF |
| 9 | Barren Arcs | GF |
| 10 | Barren Land | GF |
| 11 | Overpass
Landmark: Arcing Stones |
GF |
| 12 | River Cliff | GF |
| 13 | Endless Pit | GF |
| 14 | Paw Cliffs | GF |
| 15 | Torn Road | GF |
| 16 | Fractured Path | GF |
| 17 | Great Scar
Landmark: Hourglass Pillar |
GF |
| 18 | West Entrance
Landmark: West Entrance |
GF |
| 19 | Temple Entrance
Landmark: Faj'ro Balcony |
GF |
| 20 | Faj'ro Roof | GF |
| 21 | Mystery Cave | GF |
| 22 | Toisecave | GF |
| 23 | Windless Caverns | GF |
| 24 | Barren Temple Entrance | GF |
| 25 | Barren Temple Hall | GF |
| 26 | Brigand Cave | GF |
| 27 | Maroon Cave 1 | U1 |
| 28 | Maroon Cave 2 | U1 |
| 29 | Maroon Cave 3 | U1 |
| 30 | Deadly Oasis | GF |
| 31 | Bone Lair | GF |
| 32 | Cursed Temple | U1 |
| 33 | Treasure Room | U2 |
| 34 | Barren Temple Core | U1 |
| 35 | Barren Temple Treasury | U2 |
| 36 | Testing Area | GF |
| 37 | Testing Finale | GF |
| 38 | HP Reception | U1 |
| 39 | Coal Processor | U1 |
| 40 | Hot Office | U1 |
| 41 | Central Test Chamber | U2 |
| 42 | Right Test Chamber | U2 |
| 43 | Mortal Chamber | U2 |
| 44 | Lead Office | U2 |
Chests
| Acc. | Type | Contains | Location | Info |
|---|---|---|---|---|
| 1 | 3 × |
Rising Railway | Use the crates to jump far enough | |
| 2 | 6 × |
East Entrance | Use the crates filled with vegetable to get up | |
| 3 | 4 × |
Dusty Path (Top) | ||
| 4 | 2 × |
Crossroad (Right side) | ||
| 5 | 7 × |
Vivid Path (Bridge) | ||
| 6 | 2 × |
Vivid Path (Bottom) | Halfway through the puzzle to continue to the Oasis | |
| 7 | 6 × |
Maroon Oasis (Top) | ||
| 8 | 2 × |
Maroon Oasis (Tree) | ||
| 9 | 1 × LV28 |
Bright Path | ||
| 10 | 4 × |
Long Piece | Lower the barrier on the right of the area | |
| 11 | 3 × |
Barren Land | Solve the puzzle in the upper part | |
| 12 | 2 × |
Crossroad (Left side) | From the upper right side of Barren Land, after solving the puzzle there | |
| 13 | 1 × LV25 |
Dusty Path (Mid) | Complete the puzzle in Long Piece, follow the upper path to Crossroad and hit the switches. Then pass through the upper puzzles in Barren Land, and pass through Crossroad on the left ledge | |
| 14 | 4 × |
Overpass (Top) | From the upper left side of Barren Land, after solving the puzzle there | |
| 15 | 2 × |
Overpass (Left side) | Unlock the overpass from the upper left side of Barren Land, then jump onto the platform near the left side of the overpass | |
| 16 | 6 × |
River Cliff (Left side) | ||
| 17 | 1 × LV25 |
River Cliff (Right side) | Jump down the Lily pads, activate the switch, use the High Jump Panel. | |
| 18 | 5 × |
Endless Pit (Mid right) | ||
| 19 | 3 × |
Endless Pit (Bottom left) | ||
| 20 | 2 × |
Endless Pit (Mid left) | From the upper right side of River Cliff; you must hit three switches in Endless Pit first to open the path | |
| 21 | 7 × |
Barren Arcs (Right side) | Solve the puzzle on the right, entrance hidden behind the Trees | |
| 22 | 3 × |
Barren Arcs (Mid) | Enter from Barren Land bottom right after finishing the puzzles there | |
| 23 | 4 × |
Torn Road (Right side) | ||
| 24 | 2 × |
Fractured Path (Right side) | Activate the switch | |
| 25 | 6 × |
Fractured Path (Mid) | Complete the Faj'ro Temple to get the | |
| 26 | 3 × |
Torn Road (Locked) | Enter from upper part of Great Scar | |
| 27 | 3 × |
Paw Cliffs (Mid) | Enter from upper part of Great Scar, use the High Jump Panel, enter from Torn Road (bottom left) | |
| 28 | 5 × |
Paw Cliffs (Top right) | Enter from upper part of Great Scar, use the High Jump Panel, enter from Torn Road (bottom left), beat all Sharkster. Complete the Faj'ro Temple to get the | |
| 29 | 2 × |
West Entrance | Solve the puzzle in the upper part | |
| 30 | 6 × |
Maroon Cave 1 | ||
| 31 | 3 × |
Mystery Cave | Complete the Faj'ro Temple to get the | |
| 32 | 1 × |
Mystery Cave | Complete the So'najiz Temple to get the | |
| 33 | 1 × |
Toisecave | Found during the Blasting Shells sidequest | |
| 34 | 4 × |
Cursed Temple | Area accessible during the A Promise Is a Promise 3 Quest. Chest is on the left path in the Cursed Temple. | |
| 35 | 1 × LV35 |
Cursed Temple | Area accessible during the A Promise Is a Promise 3 Quest. Chest is on the right path in the Cursed Temple. | |
| 36 | 1 × LV01 |
Treasure Room | Area accessible during the A Promise Is a Promise 3 Quest. Received after defeating the Cursed Sharkster. | |
| 37 | 1 × |
Lead Office | Formerly PC Exclusive. Found at the end of the Best in the West quest. |
Enemies
| Name | Sprite | Drops | Locations |
|---|---|---|---|
| Pinceron |  |
East Entrance, Dusty Path, Crossroad, Paw Cliffs, Torn Road, Great Scar, West Entrance, Fractured Path, Bright Path | |
| Boss Pincer |  |
Torn Road, Great Scar, West Entrance, Fractured Path, Windless Caverns | |
| Pincetron |  |
Overpass[3], Long Piece[3], Central Test Chamber[3] | |
| Sharkster |  |
Crossroad, Long Piece, Barren Arcs, Barren Land, Overpass, Paw Cliffs, Cursed Temple[4] | |
| Ghost Sharkster |  |
None | Treasure Room[4] |
| Drillertoise |  |
Crossroad, West Entrance, River Cliff, Vivid Path, Maroon Oasis, Bright Path | |
| Chillertoise |  |
Toisecave[5] | |
| Tim |  |
Long Piece, Barren Arcs, Barren Land, Overpass, West Entrance, Maroon Cave 2[6], Maroon Cave 3[6] | |
| Vulturbine |  |
Paw Cliffs, Great Scar, West Entrance, River Cliff, Endless Pit, Vivid Path, Maroon Oasis, Bright Path | |
| Wowturbine |  |
Windless Caverns, Barren Temple Entrance[7], Barren Temple Hall[7] | |
| Apollo 2 |  |
None | Temple Entrance[4] |
| Sandamoth |  |
Barren Temple Core[8] | |
| Legionary Turret v2 |  |
Brigand Cave[9] | |
| Cursed Sharkster (boss) |  |
Treasure Room[4] | |
| Ti'im (boss) |  |
Maroon Cave 3[6] | |
| Guard Billston (boss) |  |
None | West Entrance[9], Brigand Cave[9] |
| King Kaktorro (boss) |  |
Barren Temple Treasury[8] | |
| DON'T USE THIS (boss) |  |
Testing Finale[10] | |
| Pincerstonk i6 GX02 (boss) |  |
None | Mortal Chamber[3] |
- ↑ 1.0 1.1 1.2 1.3 1.4 1.5 With
 Valley Booster enabled
- ↑ 2.0 2.1 Additional drops not obtainable because rank is disabled during this encounter
- ↑ 3.0 3.1 3.2 3.3 Spawns during Best in the West quest (PC exclusive)
- ↑ 4.0 4.1 4.2 4.3 Does not respawn after boss battle
- ↑ Spawns during Blasting Shells quest
- ↑ 6.0 6.1 6.2 Spawns during Maroon Tree Defender quest
- ↑ 7.0 7.1 Spawns during Hot Trail quest
- ↑ 8.0 8.1 Spawns during Waves of Sand quest
- ↑ 9.0 9.1 9.2 Spawns during Just Deserts quest
- ↑ Spawns during An unfortunate Series of Features quest
Botanics
There are 17 types of botanic destructibles found in Maroon Valley.
| Destroyable | Contents | ||||||
|---|---|---|---|---|---|---|---|
 |
Alpha Dry Cactone |
| |||||
|
| |||||||
 |
Beta Dry Cactone |
| |||||
|
| |||||||
 |
Alpha Dry Shrub |
| |||||
|
| |||||||
 |
Beta Dry Shrub |
| |||||
|
| |||||||
 |
Omega Dry Shrub |
| |||||
|
| |||||||
 |
Alpha Cactone |
| |||||
|
| |||||||
 |
Beta Cactone |
| |||||
|
| |||||||
 |
Omega Cactone |
| |||||
|
| |||||||
 |
Alpha Palmapple |
| |||||
|
| |||||||
 |
Beta Palmapple |
| |||||
|
| |||||||
 |
Omega Palmapple |
| |||||
|
| |||||||
 |
Alpha Ant Hill |
| |||||
|
| |||||||
 |
Beta Ant Hill |
| |||||
|
| |||||||
 |
Omega Ant Hill |
| |||||
|
| |||||||
 |
Alpha Bone Pile |
| |||||
|
| |||||||
 |
Beta Bone Pile |
| |||||
|
| |||||||
 |
Omega Bone Pile |
| |||||
|
| |||||||
Traders
A small group of traders can be found at the start of Maroon Valley.
- Player Trader — Located in East Entrance.
| Offered Item | Credits | Requisite Items |
|---|---|---|
| 950 | 2x | |
| 1050 |
- Maroon Buffs — Located in East Entrance.
| Offered Item | Credits | Requisite Items |
|---|---|---|
| 550 | 2x | |
| 550 | 2x | |
| 550 | 2x | |
| 550 | 2x |
- Maroon Equipment — Located in East Entrance.
| Offered Item | Credits | Requisite Items |
|---|---|---|
| LV24 |
8870 | 8x |
| LV24 |
9180 | 17x |
| LV24 |
9230 | 9x |
| LV24 |
9050 | 23x |
- Maroon Loot — Located in East Entrance.
| Offered Item | Credits | Requisite Items |
|---|---|---|
| 600 | 2x | |
| 700 | ||
| 800 | ||
| 1050 |
- Maroon Metals — Located in East Entrance.
| Offered Item | Credits | Requisite Items |
|---|---|---|
| 90 | 2x | |
| 450 | 2x |
- Maroon Trade Sets — Located in East Entrance.
| Offered Item | Credits | Requisite Items |
|---|---|---|
| 100 | ||
| 100 | 2x | |
| 250 |
- Bracerboy — Located in Rising Railway.
| Offered Item | Credits | Requisite Items |
|---|---|---|
| LV25 |
9458 | 3x |
Quests
The quests that can be started in Maroon Valley are:
A New Home DLC Changes
| M.S. Solar • Rhombus Square • Rhombus Dungeon |
| Rookie Harbor • Autumn's Rise • Autumn's Fall |
| Bergen Trail • Bergen Village • Temple Mine |
| Maroon Valley • Ba'kii Kum • Faj'ro Temple |
| Gaia's Garden • Basin Keep • So'najiz Temple • Zir'vitar Temple • Grand Krys'kajo |
| Sapphire Ridge • Old Hideout |
| Vermillion Wasteland • Vermillion Dungeon • Vermillion Tower |
| Homestedt • Azure Archipelago • Ku'lero Temple |
The A New Home DLC adds only small changes to Maroon Valley. There is a fight against Sao, the area is visited briefly during a quest, and a new secret trader is added.
Enemies
| Name | Sprite | Drops | Locations |
|---|---|---|---|
| Pengpeng |  |
Maroon Oasis[2] | |
| Sao |  |
None | Barren Land[3] |
- ↑ Additional drops not possible due to combat rank being disabled during this encounter.
- ↑ Spawns during the Lost and On the Run quest.
- ↑ Fought after speaking to him in Ba'kii Kum.
Traders
- Glitch Trader — Located in Testing Area after defeating DON'T USE THIS in the Arena.
| Offered Item | Credits | Requisite Items |
|---|---|---|
| LVL↑ |
169420 | LV60 |
Role in the Plot
In CrossWorlds
Seekers initially pass through Maroon Valley on their way to Ba'kii Kum, in order to request access to the Faj'ro Temple. The Ba'kii Kum Eldress first requests their assistance in the mandatory quest Maroon Tree Defender. During this quest, Seekers return to Maroon Valley and enter the cave under the Maroon Oasis, where they must defeat several Tims and the Ti'im boss in order to protect the Maroon Tree. After doing so, they can arrange access to the Temple.
In CrossCode
After arriving in Maroon Valley, Lea is immediately joined by Emilie. The two travel through the area to Ba'kii Kum, with Emilie complaining about a school project and how she got in trouble for missing a meeting.
The next day, Lea meets up with C'tron for the first time in Maroon Valley. The two travel to the Maroon Oasis and complete the Maroon Tree Defender quest together. Afterwards, Emilie comes online and rushes to complete the quest herself, while the other two return to Ba'kii Kum to wait for her. After another encounter with Apollo in Ba'kii Kum, Lea is challenged to another duel, which then takes place in front of the Faj'ro Temple. After the duel, Lea, Emilie and C'tron enter the temple together.
The three friends meet up briefly on the balcony halfway through the temple, then again at the top, where Emilie finally learns about Lea's speech synchronization issues. The three log off afterwards, and Lea has a long lucid dream about a location in Sapphire Ridge. When Lea logs back on, Sergey reveals that due to complications on his side, she has been offline for 3 days.
During the A New Home DLC, Lea and C'tron briefly return to Maroon Valley to visit where they first met, in the hopes of restoring C'tron's memories.
Trophies
- There is no Cow Level
- Visit the Perfectly Normal Cactus in Long Piece.
- They have 5 Hearts
- Defeat Ti'im.
- A cursed Booty
- Defeat the Cursed Sharkster.
- Showdown at Faj'ro
- Win the second PVP battle against Apollo.
- True Spheromancer
- Win the second PVP battle against Apollo without losing a single round.
- Maroon Landmarks
- Find all landmarks in Maroon Valley.
- Maroon Scavenger
- Obtain all chests in Maroon Valley; see #Chests.
Secrets and Challenges
By collecting the ![]() Cursed Coin in Ba'kii Kum, you can access the Cursed Temple and fight the Cursed Sharkster. This boss fight is required for the A Promise Is a Promise 3 quest, but can be completed without the quest.
Cursed Coin in Ba'kii Kum, you can access the Cursed Temple and fight the Cursed Sharkster. This boss fight is required for the A Promise Is a Promise 3 quest, but can be completed without the quest.
In the A New Home DLC, after defeating DON'T USE THIS in the Arena, a secret trader unlocks in the southwest corner of Testing Area. It can only be reached by using a Long Jump or by hopping on some mostly-invisible platforms.