Health (Hull for Railjacks) is a value that represents how much damage an entity can sustain; if the value is reduced to zero, the entity will be incapacitated in some manner. Warframes, Railjacks, Companions, Rescue targets, and certain enemies will enter "bleedout" when their health values are reduced to zero, while all other entities will instead be killed.
A Warframe's health is indicated as a red number at the top right of the screen. The health of other entities can be displayed over their heads, should the player aim directly at them. While a Warframe is losing health, the screen's edges will begin to flash red at a pulse. Once the Warframe reaches 10% health or below, a loud, heartbeat-like sound will play, and a slight ringing can be heard. This sound also plays when bleeding out and when dead.
Effects
Health determines the amount of damage the user can sustain and is the last line of defense for all entities. Once the value is depleted, most enemies will die, while Warframes and certain characters will enter a weakened state called bleedout in which they must be revived within a few seconds or be killed.
Health receives damage mitigation from armor.
Most attacks will only damage health after the entity's shields have been fully drained, but there are a few exceptions. ![]() Toxin damage will bypass shields and strike the target's health directly.
Toxin damage will bypass shields and strike the target's health directly. ![]() Viral Status Effect also increases damage dealt towards health.
Viral Status Effect also increases damage dealt towards health.
Modifying Maximum Health
Mods
")
")
")
")
")
")
")
")
")
")
")
")
")
")
")
")
Abilities

|
 2 |
Elemental Ward Depending on Chroma's elemental alignment, an offensive area-of-effect is created. Chroma and his nearby allies are imbued with defensive energy. Introduced in Update 16.0 (2015-03-19) |
| ||||||||||||||
| Subsumable to Helminth |
Info
- Chroma expends
 50 Energy to emit an aura of elemental energy, empowering himself and nearby allies within
  6 / 8 / 10 / 12 meters for
  10 / 15 / 20 / 25 seconds, providing both offensive and defensive buffs.
- Energy cost is affected by Ability Efficiency.
- Duration is affected by Ability Duration.
- Aura radius is affected by Ability Range.
- Elemental Ward exhibits different effects depending on Chroma's current elemental alignment, determined by Chroma's primary emission color or the selected element of
 Spectral Scream.
- Generates a flame aura around Chroma and affected allies that increases base Health by
 15% / 20% / 30% / 55% and inflicts 25 / 50 / 75 / 100
  Heat damage per second within a radius of 5 meters with a 2% / 5% / 7% / 10% status chance. The radius of this damage effect is not increased with ability range.
- Infuses Chroma and affected allies with an electric current that increases base Shields by 10% / 15% / 20% / 30% and converts incoming damage into arc discharges. An arc discharge inflicts 250% / 300% / 500% / 1,000% incoming damage as
 Electricity damage to a single target within 5 / 6 / 8 / 10 meters with a 10% / 15% / 20% / 25% status chance. Arc discharges will inflict a minimum of 50 / 60 / 100 / 200 Electricity damage.
- The shield bonus stacks additively with base shield modifiers.
- A rank-3 Elemental Ward with
 Intensify and a maxed Redirection will increase Chroma's shield capacity to ⌊370 × (1 + 1 + 0.3 × 1.3)⌋ = 884.
- A rank-3 Elemental Ward with
- Arc damage bypasses obstacles in the environment.
- The final damage of an arc discharge is determined by the amount of shields and/or health lost by incoming damage. For example with a maxed Intensify, losing 100 shields from a single instance of damage will produce an arc that inflicts 100 × 10 × 1.3 = 1,300 Electricity damage at rank 3 to a single target as long as it's within range.
- Damage from environmental hazards can also be converted into arc discharges.
- Arcs can strike the same target multiple times, and arcs can be produced in quick succession should Chroma and allies receive multiple instances of damage that exceed the minimum threshold.
- The shield bonus stacks additively with base shield modifiers.
- Emits an aura of noxious fumes around Chroma and affected allies that increases base Reload Speed by 15% / 25% / 30% / 35%, as well as weapon damage when Holstering by 15% / 25% / 30% / 35% for ? / ? / 3 / 3 seconds. Within a radius of 5 meters, the noxious fumes also have a 25% / 35% / 40% / 50% chance per second to deal 5% of an enemy's maximum health as
 Toxin damage with a 100% status chance.
- The Toxin damage will only be applied to an enemy if it is not already affected by a Toxin proc, but can occur as soon as an existing Toxin proc expires. As such, its effect cannot stack with itself but can refresh itself every 7 seconds.
- Damage bypasses obstacles in the environment and does not decrease with distance.
- Encases Chroma and affected allies in a layer of frost that increases base Armor by 25% / 70% / 90% / 145% and creates an ice shield that reflects incoming gunfire back to its source. Reflected damage is increased by 150% / 200% / 250% / 300% and has a 10% / 15% / 20% / 25% status chance.
- The armor bonus stacks additively with base armor modifiers.
- A rank-3 Elemental Ward with Intensify and a maxed Steel Fiber will increase Chroma's armor to ⌊370 × (1 + 1 + 1.45 × (1 + 0.3))⌋ = 1,437.
- As with all other additive armor bonuses, Elemental Ward's bonus is applied before multiplicative armor bonuses.
- A rank-3 Elemental Ward with
- Incoming hitscan and non-hitscan projectiles are physically redirected after hitting Chroma. As such, obstacles in the environment can prevent reflected damage from hitting enemies.
- Hitscan projectiles are reflected directly to the source enemy regardless of distance from Chroma. Melee attacks are not reflected.
- Non-hitscan projectiles are reflected in the direction of the source enemy.
- Does not prevent damage to Chroma aside from the additional armor bonus and other damage reduction rules; Chroma will be hit normally before reflecting weapons fire.
- The armor bonus stacks additively with base armor modifiers.
- Elemental Auras of any type from two or more Chromas do not stack and only the first aura will apply its benefits as long as the player is within buff range. For example, two Heat auras do not increase damage nor health values, and possessing a Heat aura will negate receiving a
 Cold aura.
 - Has a casting delay of 1 second. The animation interrupts movement and other actions.
- Elemental Ward cannot be recast while active.
- Elemental Ward does not work on Nekros' Shadows.
- Subsuming Chroma to the Helminth will offer Elemental Ward and its augments to be used by other Warframes. The Ward's effects are determined by the Warframe's primary emission color.
Augment
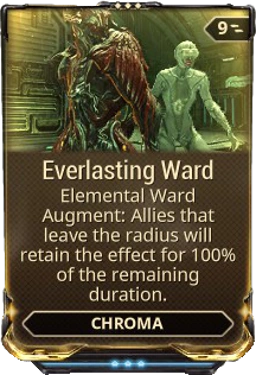
- Main article: Everlasting Ward
Everlasting Ward is a Warframe Augment Mod for ![]() Chroma that allows allies to retain
Chroma that allows allies to retain ![]() Elemental Ward's effects upon moving out of its range, lasting for a percentage of Elemental Ward's remaining duration.
Elemental Ward's effects upon moving out of its range, lasting for a percentage of Elemental Ward's remaining duration.
Tips & Tricks
- In a pinch, the bonus Health provided by the Ward can be used as a quick heal, as the Health granted is automatically added to your remaining health and is not reduced from your remaining health when Elemental Ward wears off.
- The Ward is capable of damaging containers and hazards, albeit fairly slowly. Combining Elemental Ward with Spectral Scream and range mods will make for a useful farming tool so long as you have the energy to maintain it.
- Can be used to great effect on Survival and Exterminate missions where enemies approach you from all directions and are often difficult to locate or target. At maximum Ability Strength, the damage reflected can easily finish off weaker enemies and potentially stun any survivors.
- Works very well with weapons that require you to reload frequently or have long reload times.
- Its damage increase is considered as a Universal base damage increase, same as
 Vex Armor and
  Arcane Arachne
 - Can reduce recharge delay for
 Cycron or a Kitgun equipped with
  Pax Charge, however, it does not affect recharge rate.
Bugs
- Allies who enter, leave, then re-enter the radius of Heat-oriented Ward will not regain the buff on the same cast of Elemental Ward. This results in an empty space where the bonus health should have been, even if they took no damage at all.
- This causes Medi-Ray and other healing abilities to attempt to heal the player, but if the player gets out of Elemental Ward's range, their health will return to normal again, wasting the health restored in the process.
- This causes
- The in-game UI shows the armor bonus from the Cold aura as a flat bonus rather than a percentage.

|
 1 |
Reservoirs Choose and summon a Reservoir filled with Motes that attach to and aid Wisp and her allies. Haste Mote grants increased movement and attack speed. Vitality Mote increases maximum health and heals over time. Shock Mote stuns nearby enemies. Introduced in Update 25.0 (2019-05-22) |
| ||||||||||||
Info
- Birthed from Wisp's dimensional habitat, three species of Reservoir pods nursing friendly Motes can be selectively summoned by Wisp. Tap the ability key to freely cycle the selection wheel between the Vitality, Haste, and Shock reservoirs. Hold down the ability key to summon the selected reservoir from a portal above Wisp for 25 energy, placing the pod directly in front of her. The reservoir pods have a range of 5 meters and last indefinitely, while the motes retrieved from the pods lasts 19 / 22/ 26 / 30 seconds while outside of the reservoirs. Wisp can summon a maximum of 6 reservoir pods.
- Casting additional reservoir pods will replace the oldest pod.
- Up to three different reservoir types can be unlocked as the ability is ranked up:
- Vitality: unlocked by default (Unranked Warframe)
- Haste: unlocked at rank 1 (Warframe Rank 7)
- Shock: unlocked at rank 2 (Warframe Rank 14)
- Reservoir selection wheel is displayed above the ability icons. The icon for the currently selected type is enlarged and shown on the left of the wheel. Tapping the ability key (default 1 ) will cycle between the reservoir types, while holding the key will deploy the selected reservoir (tap/hold functions can be inverted in the Settings).
- Reservoir pods are invulnerable static floating objects that are permanently placed until removed by Wisp or by colliding with Nullifier Crewman bubbles.
- Each reservoir pod spawns a floating Mote above it, which can be plucked an infinite amount of times by Wisp, other Warframes, Companions, summoned allied units such as Specters and Railjack Crews, allied Invasion units, Hostages, converted Liches and Sisters, Kavor Defectors, Sortie and Arbitrations Defense Operatives, and Defense Objects coming into the reservoir's range.
- Motes grant the affected entity a specialized buff based on the reservoir type.
- Motes respawn from their reservoirs after a brief cooldown if taken by an entity.
- Motes last for a duration, with their timers able to be refreshed and paused indefinitely while the buffed entities are standing in range of the respective reservoir type.
- Reservoir pods take on Wisp's Ability Strength when placed, and will remain at that Ability Strength percentage indefinitely.
- If there are multiple reservoir pods, the pod with the highest buff value will take effect, with its corresponding duration.
- A lower-value pod will still refresh the duration of a higher-value pod.
- Each entity is limited to 1 active Mote buff per reservoir type.
- The electric charge shows as electricity surging around the Shock Mote when ready to discharge.
- Ability Synergy:
- Casting
 Breach Surge on an active reservoir pod will teleport Wisp to its location and double Breach Surge's range.
- Targeting a reservoir pod with the reticle will encircle it with Wisp's chosen energy color to indicate Breach Surge's ability to be cast on it and can be used at any range, provided there is line of sight.
- Reservoir pods can be targeted through solid surfaces provided there is vision of them (e.g. windows).
- Wisp cannot teleport to a pod while within less than 10 meters of it.
- Currently obtained Motes provide additional properties to
 Sol Gate.
- Casting
Augment
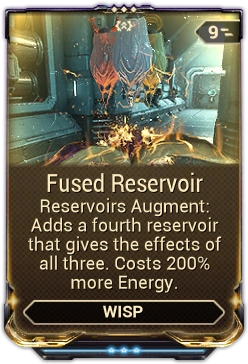
- Main article: Fused Reservoir
Fused Reservoir is a Warframe Augment Mod/Exilus Mod for ![]() Wisp that allows her to spawn a fourth
Wisp that allows her to spawn a fourth ![]() Reservoir with all three buffs at an increased energy cost.
Reservoir with all three buffs at an increased energy cost.
Tips & Tricks
- Avoid using Shock Motes in Spy missions, as it can hit Grineer Sensor Regulators and alert them.
- Because motes will refresh the duration of any other mote buff (regardless of power), you can make very effective use of temporary Ability Strength buffs such as Growing Power, Energy Conversion, or (especially) the power increase from a Void Fissure mission. You can put down reservoirs while under these effects, acquire more powerful reservoir buffs, and then endlessly refresh their duration using regular-strength reservoirs. This makes any buff to power strength effectively infinite in duration, so long as you do not let your reservoir buffs expire (or get nullified).
- Similarly, if there are multiple Wisps in a mission, they can space their reservoirs out to effectively gain all the buff benefits of the strongest Wisp, while also increasing the area covered.

Other
")
")
")
")
")
")
")
")
Like most attribute values, Health is increased by single multiplier formed from effects that additively stack with each other. The health gained from leveling is an exception, stacking additively with base health before multipliers
Total Health = (Base Health + Warframe Rank Bonuses) × (1 + Modifier from Mods) + Other Bonuses
- Base Health refers to the Warframe's health at Rank 0.
- Warframe Rank Bonuses are increases to a Warframe's health that apply as the Warframe goes from rank 0 to 30. These are normally +100 at rank 30, though there are exceptions. Importantly, unlike capacity, they are not impacted by mastery rank, meaning that two players with newly built frames will always have the same bonuses regardless of their mastery.
- Modifier from Mods is from mods such as Vitality and Vigor, increasing the Health by 100% and 50% at their maximum ranks, respectively. The Physique Aura mod increases it by 20% at maximum rank. Each additional squad member that brings Physique will increase your Modifier by an additional 20%, to a maximum 80% addition in a four-player mission, which can be further increased with Coaction Drift. Lastly, the bonus from some Arcane helmets contribute to this modifier.
Health Reduction

Healing
- Main article: Healing
Unlike shields, health does not naturally regenerate over time, except when either the ![]() Rejuvenation or
Rejuvenation or ![]() Dreamer's Bond Aura mod is equipped by at least one member of the squad. Otherwise, damage inflicted upon health must actively be healed by picking up Health Orbs, by receiving the effects of certain Warframe abilities, or by using certain mods, weapons, consumable equipment, or Arcane Enhancements.
Dreamer's Bond Aura mod is equipped by at least one member of the squad. Otherwise, damage inflicted upon health must actively be healed by picking up Health Orbs, by receiving the effects of certain Warframe abilities, or by using certain mods, weapons, consumable equipment, or Arcane Enhancements.
Bleedout & Death
- Main article: Death
When health is reduced to 0, Warframes enter the Bleedout state. In bleedout, Warframes can barely move and are restricted to firing their sidearm. If they do not receive the appropriate attention from an ally within 20 seconds, they are killed in action. It is quite difficult to complete missions successfully when all players are dead, so players typically strive to keep health above 0 at all times.
Effective Health
Damage calculations get complicated when damage resistances are involved. Effective health (EHP) is a common metagame concept which states that because each hit point you have actually absorbs more than one point of damage, you effectively have more hit points than indicated. In WARFRAME, effective health can be increased by armor, sources of damage reduction, negative damage type modifiers, resistance mods, and health classes.
Calculation
Effective health against a particular damage type can be calculated as such:

- Nominal health refers to listed health points as displayed in-game; in other words, it is the total health after mods and buffs are applied
- Net damage reduction refers to total damage reduction outside of armor
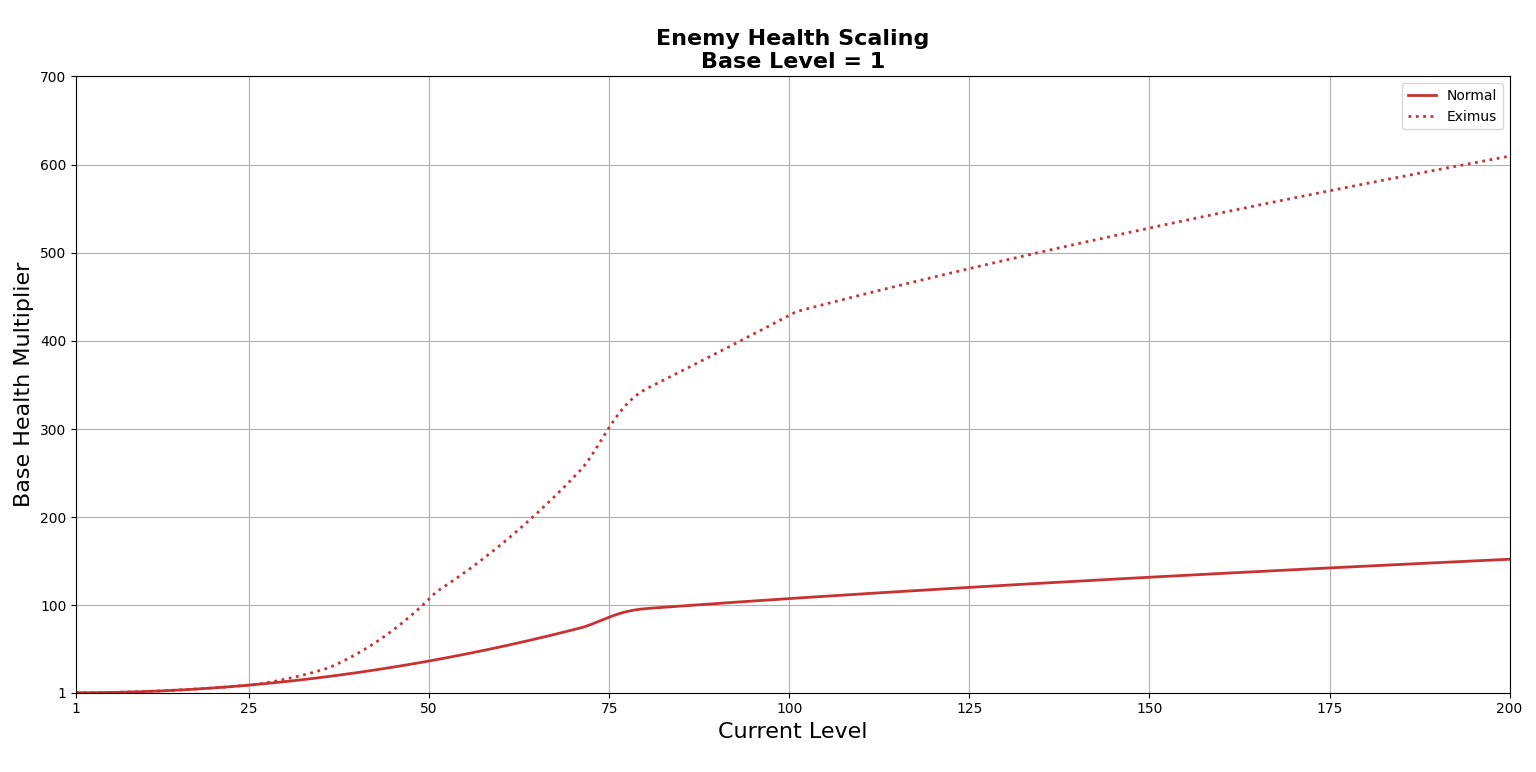
Enemy Health Scaling
- Main article: Enemy Level Scaling
For health, the ranges of level differences from base to current level at which scaling transitions is between 70 & 80.
Grineer
The formula by which Grineer health scales is as follows:
-
- When Current Level - Base Level < 70
-
- When Current Level - Base Level > 80


Corpus
The formula by which Corpus health scales is as follows:
-
- When Current Level - Base Level < 70
-
- When Current Level - Base Level > 80

Infested
The formula by which Infested health scales is as follows:
-
- When Current Level - Base Level < 70
-
- When Current Level - Base Level > 80


Corrupted
The formula by which Corrupted health scales is as follows:
-
- When Current Level - Base Level < 70
-
- When Current Level - Base Level > 80


Murmur, Sentient, and Unaffiliated
The formula by which enemy health scales is as follows:
-
- When Current Level - Base Level < 70
-
- When Current Level - Base Level > 80


Eximus
Eximus health scaling is the same across all factions
The formula by which eximus health scales is as follows:
-
- When Current Level - Base Level < 70
-
- When Current Level - Base Level > 80
In addition, the base health is also increased between certain breakpoints:
- Between level differences 0 inclusive and 15 inclusive, base health stays the same as listed in the Codex.
- Between level differences 15 exclusive and 25 inclusive, base health is linearly increased from +0% to +25% (e.g. for each level, enemy gains 2.5% base health).
- Between level differences 25 exclusive and 35 inclusive, base health is linearly increased from +25% to +150% (e.g. for each level, enemy gains 12.5% base health).
- Between level differences 35 exclusive and 50 inclusive, base health is linearly increased from +150% to +350% (e.g. for each level, enemy gains 13.33% base health).
- Between level differences 50 exclusive and 100 inclusive, base health is linearly increased from +350% to +500% (e.g. for each level, enemy gains 3% base health).
- Above level difference of 100, base health will stay +500% (6x) of its Codex value.
![{\displaystyle {{\text{Health Multiplier}}={\begin{cases}f_{1}(x),\;&x\leq 15\\(1+0.025*(x-15))*f_{1}(x),\;&15<x\leq 25\\(1.25+0.125*(x-25))*f_{1}(x),\;&25<x\leq 35\\(2.5+2/15*(x-35))*f_{1}(x),\;&35<x\leq 50\\(4.5+0.03*(x-50))*[f_{1}(x)\times (1-S_{1}(x))+f_{2}(x)\times S_{1}(x)]\;&50<x\leq 100\\6*f_{2}(x),\;&100>x\\\end{cases}}}}](https://services.fandom.com/mathoid-facade/v1/media/math/render/svg/5d99b78a04ba9e291b7c1e4babd39f34f70a5db8)
- Where the Health Multiplier is the value that multiplies an enemy's base health to its current health.
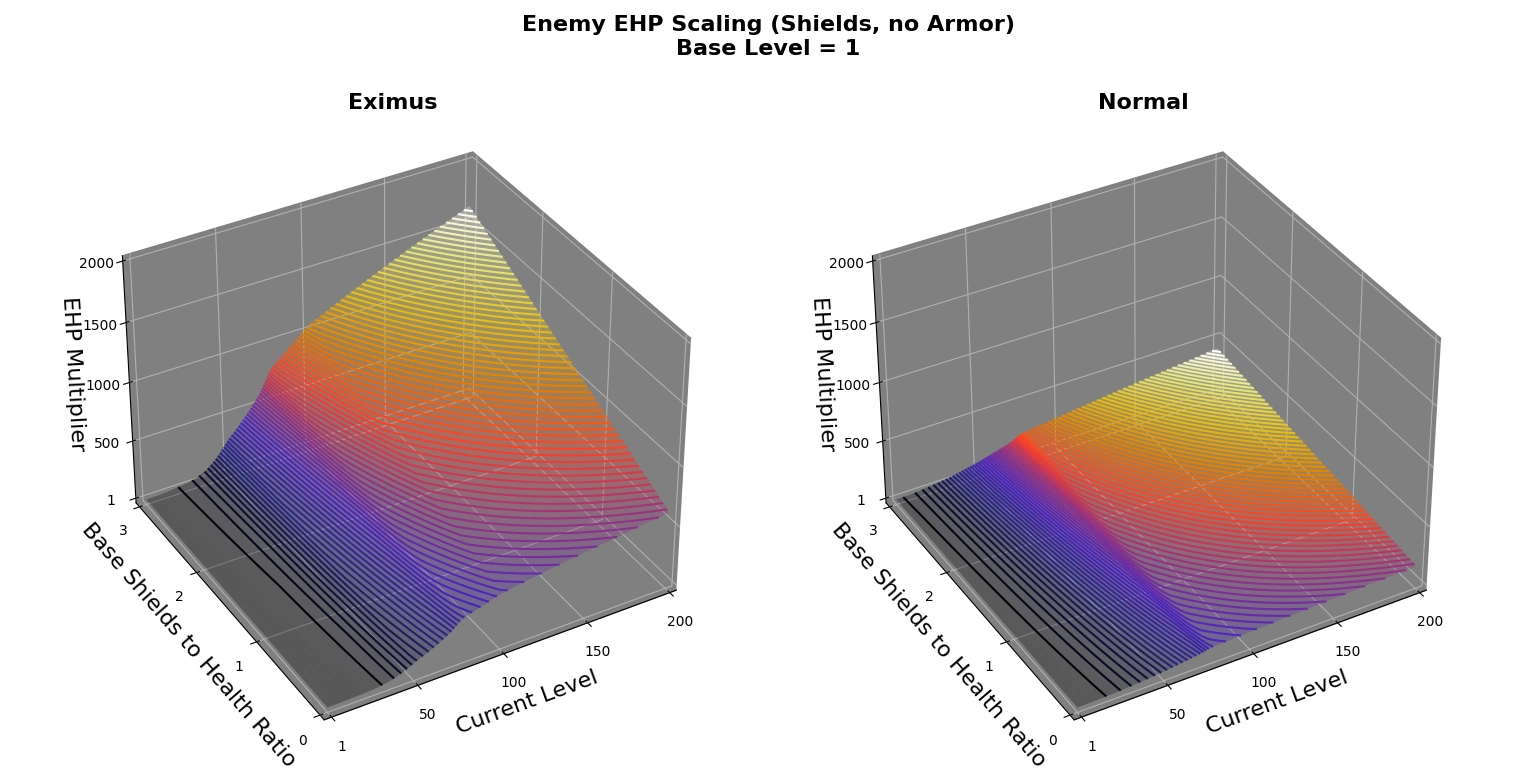
Enemy EHP
Effective Hit-points is a stat that indicates how much gross damage must be dealt to a target until the net damage thereby inflicted depletes its entire health pool. Effective Hit-points is not a fixed stat for any given enemy, it is heavily dependent on the damage type used against the target, as well as the various buffs and debuffs in effect for both the attacker and the enemy in question. For the following considerations, however, these influences are disregarded, as they do not alter the course of the graphs except for clinching or stretching them as a whole, which manifests as a scaling of the Y-axis.
For Enemies with Health only
For targets without shields and armor, the standardized effective hit-point scaling is synonymous with standardized health scaling, the health graph and formula apply.
For Enemies with Health and Shields
The standardized effective hit-points of shielded enemies are simply the sum of their shields and health, except for the case when the ![]() Toxin damage portion of the gross damage depletes the target's health faster than the rest of the gross damage depletes its shield. Exact effective hit-point calculations considering damage types also become significantly more complex if
Toxin damage portion of the gross damage depletes the target's health faster than the rest of the gross damage depletes its shield. Exact effective hit-point calculations considering damage types also become significantly more complex if ![]() Toxin damage is involved, but this is disregarded here. The level scaling of standardized effective hit-points of shielded enemies is influenced by the ratio of base shields to base health:
Toxin damage is involved, but this is disregarded here. The level scaling of standardized effective hit-points of shielded enemies is influenced by the ratio of base shields to base health:

In the cases where you are trying to one-shot shielded enemies without ![]() Toxin damage, their effective hit-points will actually be higher due to their shield gate mechanic. Only 5% of total damage dealt will only damage the enemy's health when their shield gate is active. However, attacking enemy weakpoints ignores the shield gate.
Toxin damage, their effective hit-points will actually be higher due to their shield gate mechanic. Only 5% of total damage dealt will only damage the enemy's health when their shield gate is active. However, attacking enemy weakpoints ignores the shield gate.
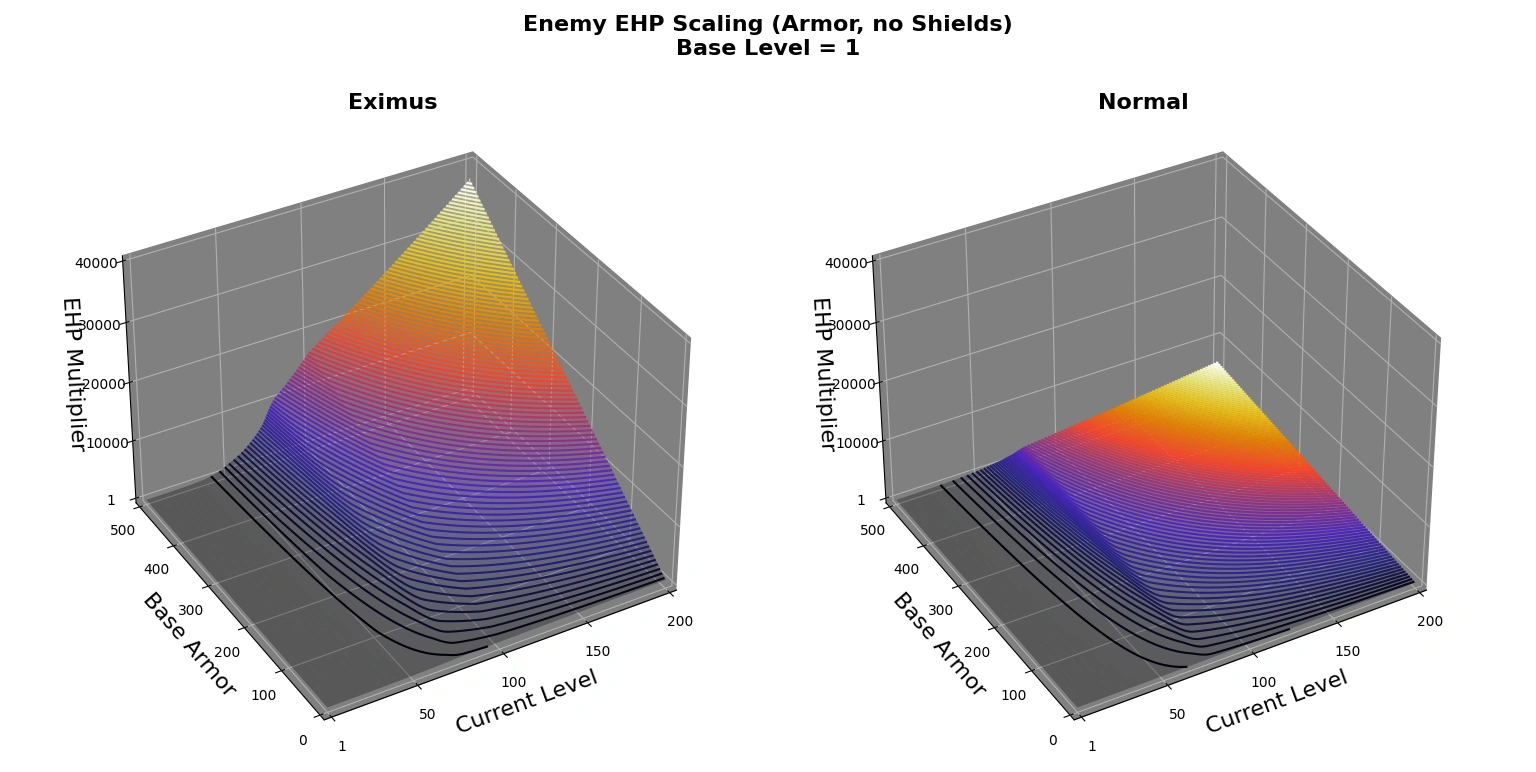
For Enemies with Health and Armor
The standardized effective hit-points of armored enemies are simply the health divided by the compliment of the damage reduction granted from armor. Because armor adds damage reduction to incoming damage on health the level scaling of standardized effective hit-points of armored enemies is influenced by the base armor itself:

For Enemies with Health, Shields, and Armor
The standardized effective hit-points of enemies that are both armored and shielded are more complex than the simple EHP cases from the previous sections above. The level scaling of standardized effective hit-points of these enemies is influenced by the ratio of base shields to base health and base armor, making the formula at least 3 variable:

References