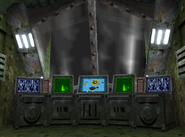
 Front view of the King Kruiser II as seen in the game Donkey Kong 64 for Nintendo 64. | |
| World(s) | K. Rool's Mobile Island Fortress, DK Island (after crashing) |
| Type | Boxing Arena |
| Music Theme(s) | King K. Rool Battle Introduction, King K. Rool Duel |
| Requirement(s) | Using a Boss Key to open the eighth and final lock on K. Lumsy's cage
|
| Notable Feature(s) | The final boss level in the game. |
| Enemies Encountered | King Krusha K. Rool |
| Game(s) | Donkey Kong 64 |
| First Appearance | Donkey Kong 64 (1999) |
| Latest Appearance | Donkey Kong 64 (1999)
|
The King Kruiser II is the final boss level in the game Donkey Kong 64. It is the second airship used by King K. Rool in the Donkey Kong series. After the player has used a Boss Key to open the eighth and final lock on K. Lumsy's cage, the large Kremling will chase the airship, causing it to crash on the beach of the DK Island. By entering the passage at the top of the crashed airship, the Kongs will face the final boss King Krusha K. Rool.
Overview
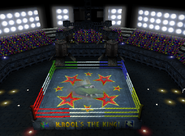
After the primates deactivated the Blast-O-Matic in the level Hideout Helm of the K. Rool's Mobile Island Fortress, K. Rool was able to escape in the King Kruiser II as a getaway vehicle. However, after takeoff, it was shortly after knocked down onto the ground by K. Lumsy, who had been playfully chasing it around DK Island. The Kongs then went into what is left of the King Kruiser II for a final boss battle against King Krusha K. Rool, which takes place inside a large boxing ring.
Boss Battle
At the boss fight, each of the five playable heroes must face K. Rool in one by one rounds. Each round has a time limit of three minutes. If the Kongs are unable to defeat K. Rool within the time limit, they will lose the round, the next one will start with the same character and the villain will regain his health from the beginning of the round. The primates do not share the same health meter, starting their respective first rounds with full health. However, they keep the current health to next round after losing the previous one. By depleting all health or all the five heroes failing to clear their turns after reaching twelve rounds, they will be sent back to the entrance of the level on the beach of the DK Island. During the boss fight, the Kongs' supplies of ammunition, Crystal Coconuts and music instrument energy are unlimited.
Donkey Kong fights K. Rool at the first round. He must avoid shockwaves caused by the boss. Soon, he must use Barrel Cannons above the poles at the edges of the arena to shoot himself at the villain's face when his guard is dropped. The round is clear after K. Rool is hit four times successfully by Donkey Kong using all the cannons.
At the second round, Diddy Kong must avoid K. Rool's boomerang glove. Later, he must use his Kong Barrel to activate the Rocketbarrel Boost and fly around the arena. While still avoiding attacks, Diddy must ascend and use his Peanut Popguns to shoot at two targets around a light fixture above K. Rool, dropping it over the boss. The Kremling will move around the arena and the primate must repeat the process for next light. Diddy must drop all four light fixtures in order to win the round.
During the third round, Lanky Kong must stay out of the K. Rool's way while he runs blind around the arena with the head still stuck inside a light fixture. Soon, four devices with numbered buttons will appear next to the sides of the ring. Lanky must use his stretchy arms in order to press a button and a pad will reveal a barrel containing a banana peel inside. The hero must grab and throw out the barrel, dropping the banana peel on the ground. Four Music Pads will appear on the corners of the arena. Lanky must move over one of the pads and activate his Trombone Terror when the banana peel is between the primate and K. Rool. If he is successful, the boss will be attract by the trombone sound, run towards Lanky and slip on the banana peel. The hero must repeat the process by hitting other buttons, throwing the barrels and using other Music Pads. The round is clear when Lanky makes K. Rool to slip on banana peels four times.
The fourth round starts by Tiny Kong having to use her Pony Tail Twirl move to glide and avoid multiple shockwaves on the ground created by K. Rool. Later, the boss will stop and Tiny's Kong Barrel will appear above the center of the arena. After getting inside it and activating her Mini Monkey move, Tiny must move quickly towards K. Rool and enter the hole on his right shoe. Inside, she must get out of the way of K. Rool's toes when they move forward. Eventually, the first toe will rise and Tiny must shoot at it once by using her Feather Bow. She will leave the shoe, return to her regular size, and K. Rool will create shockwaves again. Each time, Tiny must repeat the entire previous process, except for hiting the second toe twice, the third one thrice and the fourth one four times. Tiny will win the round after all K. Rool's toes are defeated.
At the fifth and final round, K. Rool will move around the arena by bouncing on the lateral ropes of the ring, and he will turn invisible. Chunky Kong must avoid the boss by using his still visible shadow. A blue Kong Switch will appear on the center, and after being hit, it will reveal four Chunky's pads on the corners of the arena. By activating one of them and using his Gorilla Gone move, Chunky will also turn invisible, making K. Rool and a Kong Barrel above the center visible to him. After entering it and using the Hunky Chunky move to turn into a giant, Chunky will be placed on a corner of the arena and he will be unable to move. K. Rool will run towards the primate trying to punch him. However, before it happens, Chunky must use good timing and his Primate Punch move to attack the boss. After that, Chunky will return to his regular size and K. Rool will repeat the previous attack patterns. By repeating the same strategy, Chunky will win the round and the boss fight after punching K. Rool four times successfully.
During the ending cutscene, after King K. Rool is defeated and has passed out on the ring, some Kritters will try to awake him up, while Chunky celebrates his victory. Suddenly, K. Rool will stand up and try to attack the distracted Kong. However, Candy Kong will arrive by using an entryway of the arena and catch the attention of the Kremling. While K. Rool is distracted, Funky Kong will enter the local by using the entryway at the opposite side. The primate will use a bazooka to shoot a big boot at K. Rool's back, sending the villain flying upwards. Outside, K. Rool will land into K. Lumsy's Island. While three seals watch the event from the sea, some K. Lumsy's grunts and loud shaking can be heard, implying that the giant is beating down the villain. Soon afterwards, K. Rool is sent flying again towards his Mobile Island Fortress. The next cutscene follows revealing the credits for the development staff of the game while showing the Kong Family and his allies around the DK Island. Additionally, if the player was also able to collect all 201 Golden Bananas in the game, a special ending cutscene will show some funny bloppers envolving characters and enemies from the game.
Gallery
Pictures
Sceneries
Screenshots
Trivia
- Similar to other locations in the game Donkey Kong 64, such as K. Lumsy's Island and Kong allies' stores, the boxing arena inside the King Kruiser II seems too big to be contained in the structure of the airship when comparing dimensions between interior and exterior views.
- The Flying Krock from the game Donkey Kong Country 2 can be considered a predecessor airship to the King Kruiser II, even if both airships do not share the same name.
- Both later iterations of the King Kruiser II, K. Kruizer III, from the game DK: King of Swing, and King Kruizer IV, from the game DK: Jungle Climber, are spelled with a "Z" instead of a "S".
| Donkey Kong 64 Areas | |
|---|---|
| Main Areas | DK Island • K. Rool's Mobile Island Fortress • K. Lumsy's Island • Banana Fairy Island |
| Levels | Jungle Japes • Angry Aztec • Frantic Factory • Gloomy Galleon • Fungi Forest • Crystal Caves • Creepy Castle • Hideout Helm • King Kruiser II |


